No. 4…When Bakes Don’t Work

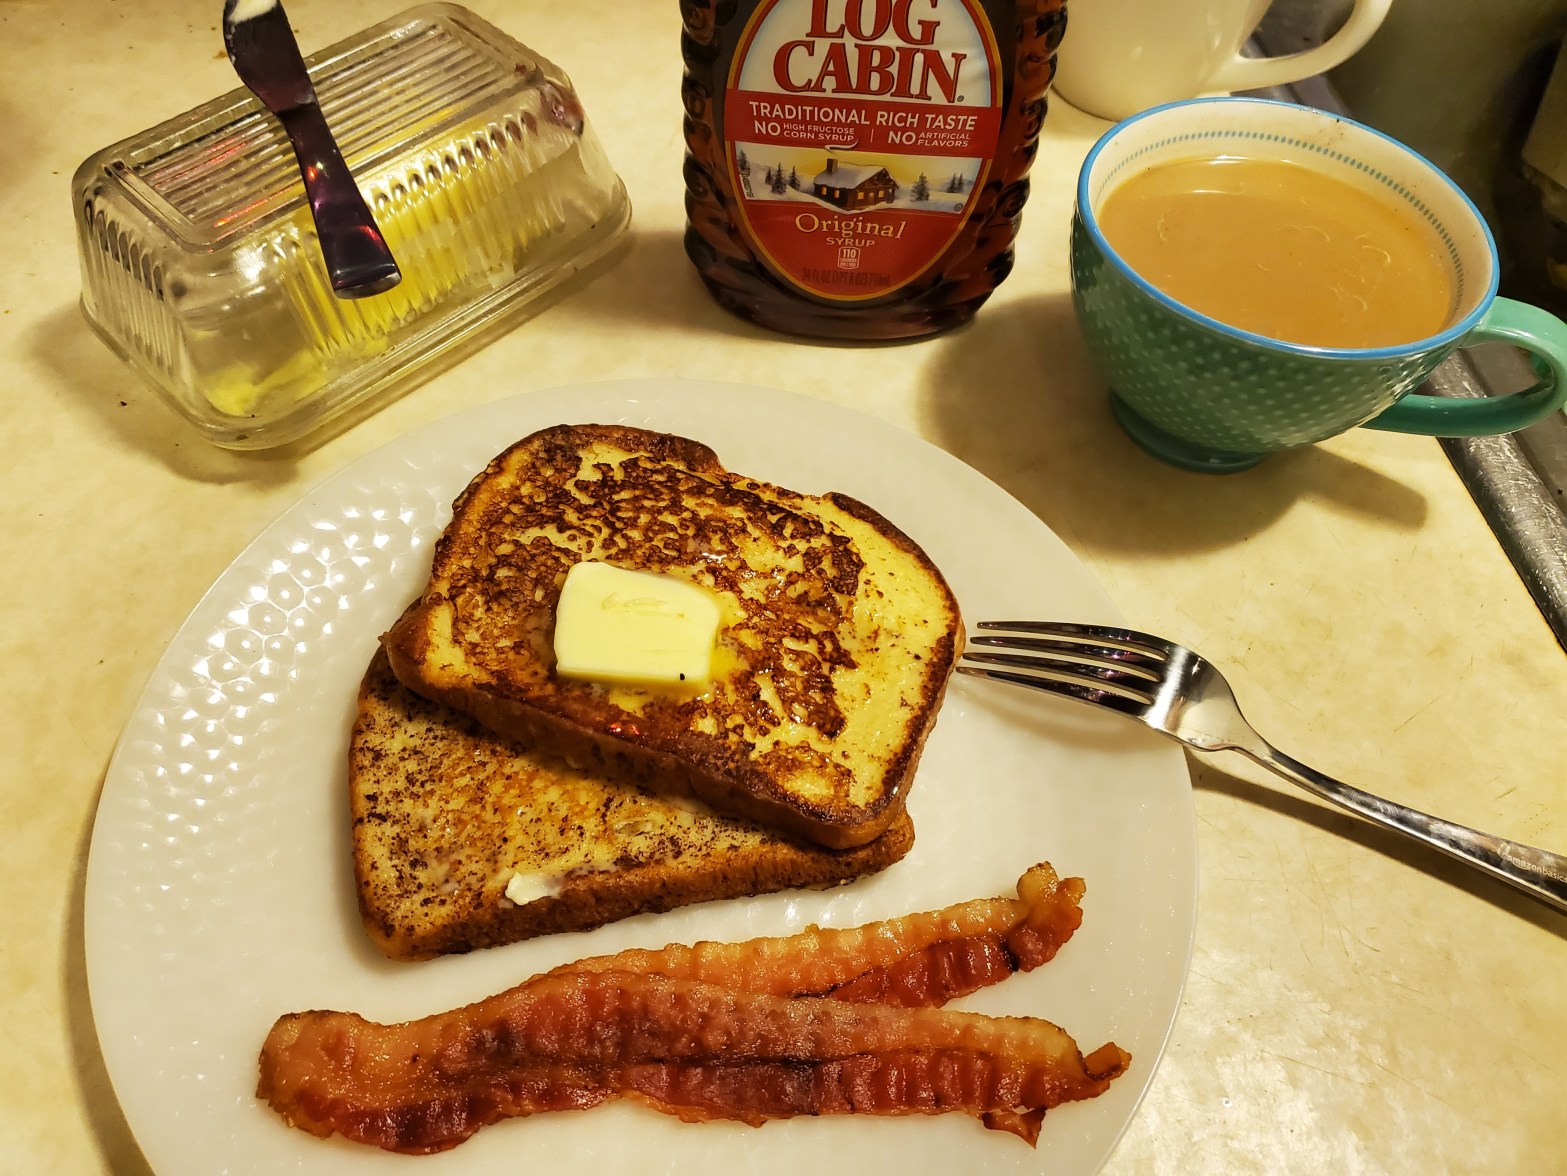
Have you ever had a bake or a cooking experience go awry? Yeah, me too. Guess what? You learned something! I mean, don’t get me wrong, when it goes really awry, it can be frustrating, saddening, and annoying. You spent all this time on making a thing, and maybe it’s inedible, or slightly burned, or over-salted, or looks horrible. But, when things don’t go how we expect, it means we learn something. It means we can try again, and look at what we did, or our tools, and find out how to make it better the next time.

This happens to me a lot when I bake. I’ve definitely made some meals that weren’t great, but baking is the tricky one. Cooking is…fluid. More natural to me. Add a bit of this, a bit of that, maybe read up on the best way to cook meat, but I get the basic principles. It’s easier for me to throw something together. I know not everyone has that skill, but this is why I started this blog! I wanted to share what I’ve learned, and what I continue to learn every day.

Baking…oh, baking. That fickle little chemistry experiment. I’ve made so many cookies and cakes, but I’m still learning, as Mary Berry likes to say. Just because I’ve made my chocolate chip cookies a million times, doesn’t mean I understand why they turn out the way they do. So – I’m still learning, especially about bread. So let’s talk about bread.

What is Bread?

[Enter Raven, wearing her food historian cap.]

Photo from pxhere.

Bread is a product of a dough made from flour and liquid, in it’s most basic form, though the discovery of yeast through the fermentation process is what has made bread the most interesting powerhouse food. We’ve found evidence of breads being made as early as 30,000 years ago, tens of thousands of years before cultivating wheat was the main way of producing bread, and tens of thousands of years before fermentation was being used in food, as far as we can find.

The flour can take many forms: wheat, spelt, rye, nuts, seeds, corn… and each has it’s own amazing properties. They all have different gluten levels (or none at all), which can affect the structure, or density, of the bread. They all have their own flavor profiles, and, their own abilities to make amazing, springy, chewy, crusty, flavorsome loaves full of gluten or gluten-free goodness.

The liquid used also changes the bread. Typically water, you can also use milk, buttermilk, yogurt, beer, eggs, sparkling water…but the first reason we add a liquid is to form a paste/dough that can be cooked on a heat source. Any other qualities of the liquid will change the final product, including keeping the leavening agent from working, the taste, and the texture.

Speaking of leavening agents – obviously, the oldest form of this is yeast! Yeast is actually a naturally occurring microorganism that can, quite literally, be found by mixing flour and water and letting it sit – or ferment – over time. This is how sourdough is made. The microorganisms need to eat, after all, and the proteins and sugars that naturally occur in foods are very tasty, causing these organisms to multiply, and their waste from all this eating, is gas – carbon dioxide, just like us! Since gas can be trapped, when you put it in a flour/liquid mixture, you get bubbles – and thus, rise – from your bread. Commercially, yeast comes in many forms, for different kinds of things: bread, wine/distiller, beer, nutritional. Other ways of leavening bread are by creating a chemical reaction with an acid and an alkaline, such as vinegar and baking soda, or baking powder and sparkling water.

So, that’s the basics of bread. Now, how does it go wrong? Let’s look at a few ‘case studies’ from my own kitchen.

BREAD PITFALLS

OVER BAKING

I think there’s something wrong with my oven. No, really.

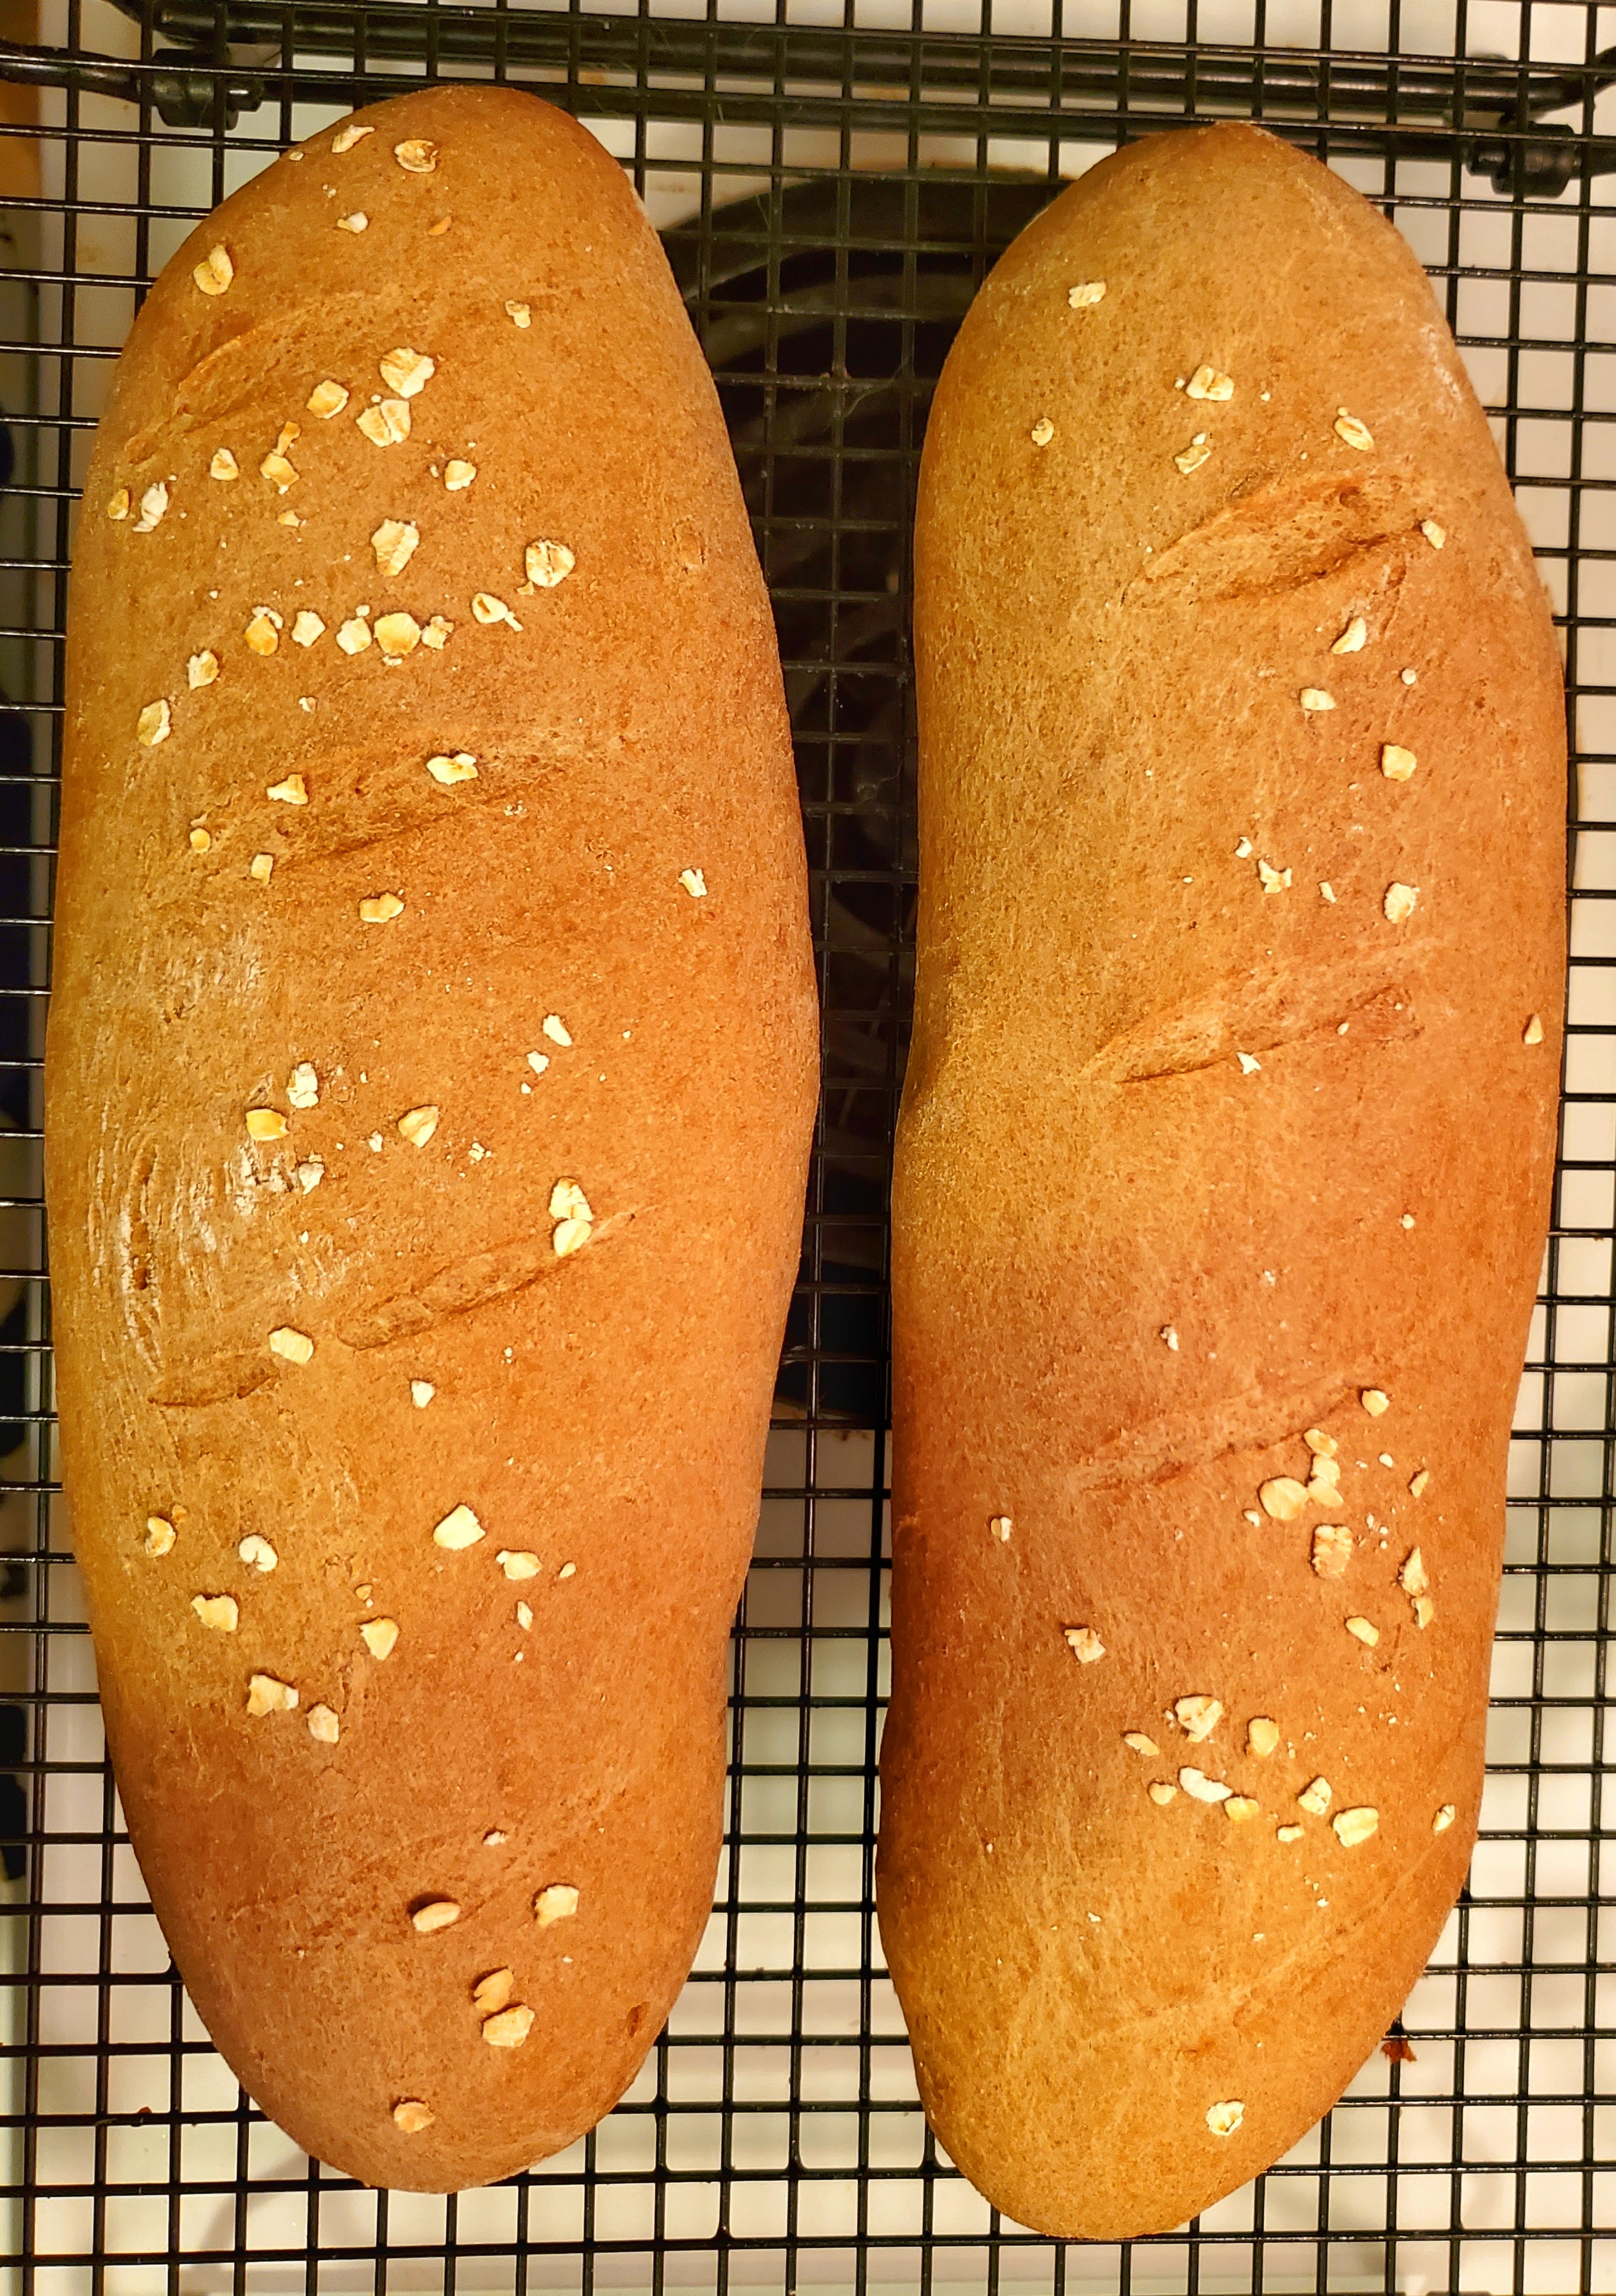
It doesn’t seem to matter what bread I’m baking, everything always darkens too much before it’s baked inside. Even quick breads, like zucchini bread, get a little over done on the bottom. I’ve mostly gotten around this by putting an extra pan on the lowest rack to block some of the heat. But this doesn’t really work very well – even, sometimes, for cookies.

I’ve looked into figuring out how to adjust the temperature of my oven, but since I live in an apartment, and the model of oven is too old to find the manual online, so my resources are limited. I’m hoping if I take a stab at it, it will help. (But I’ll let you know how that works out!)

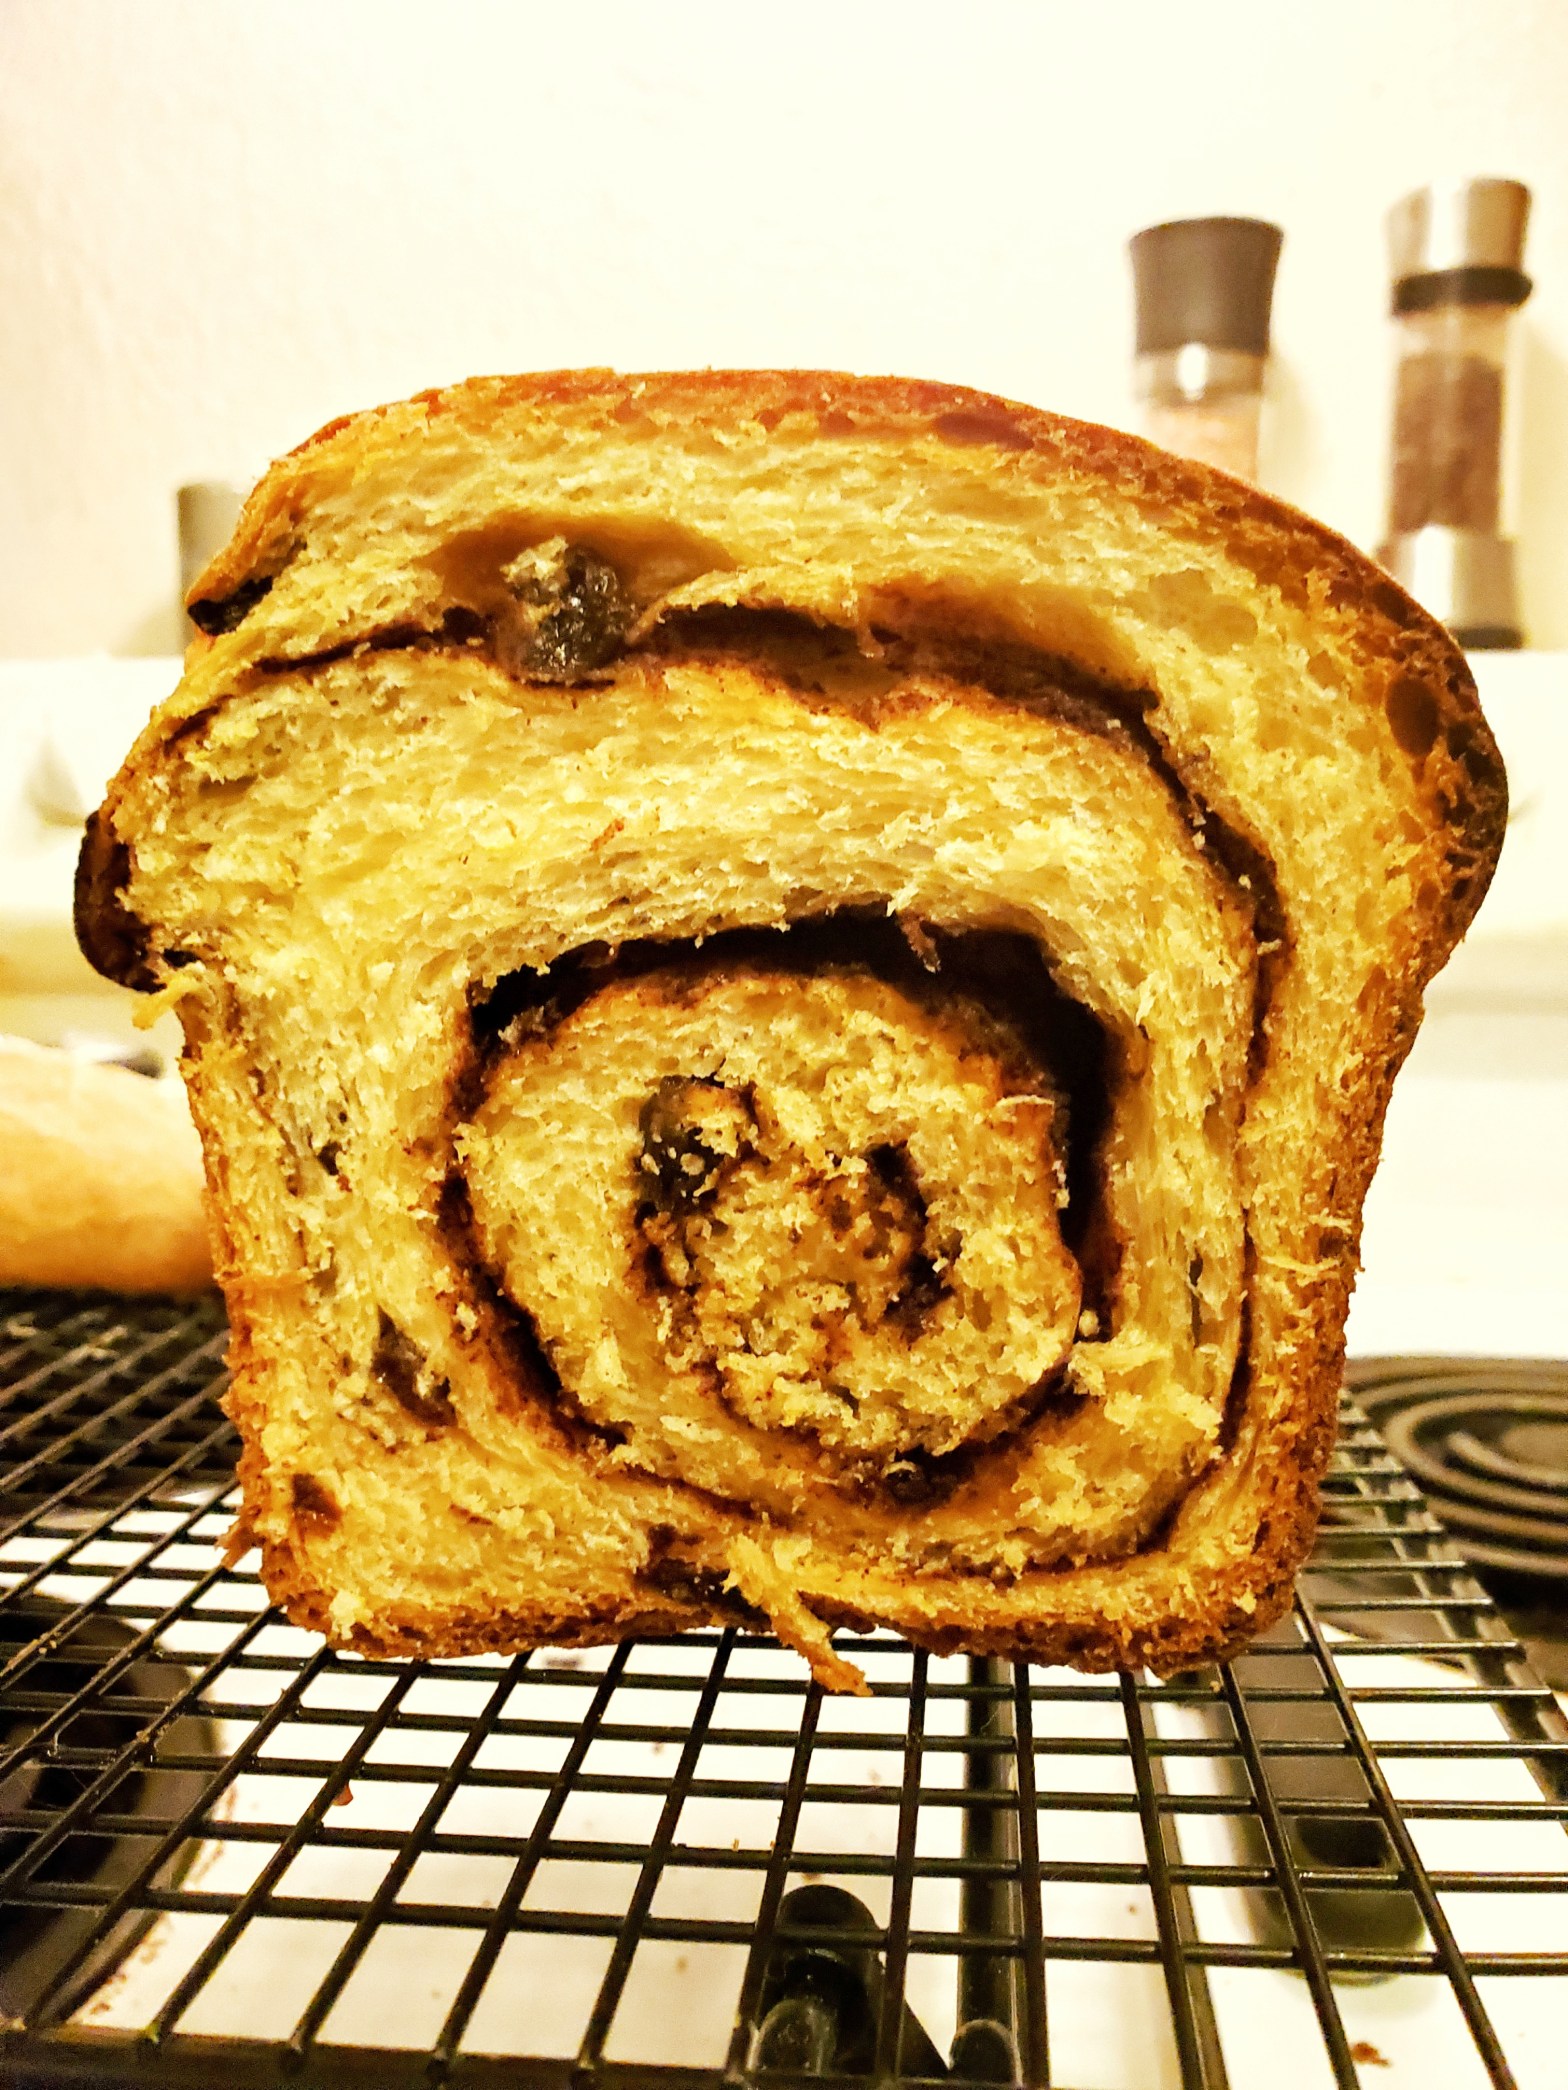
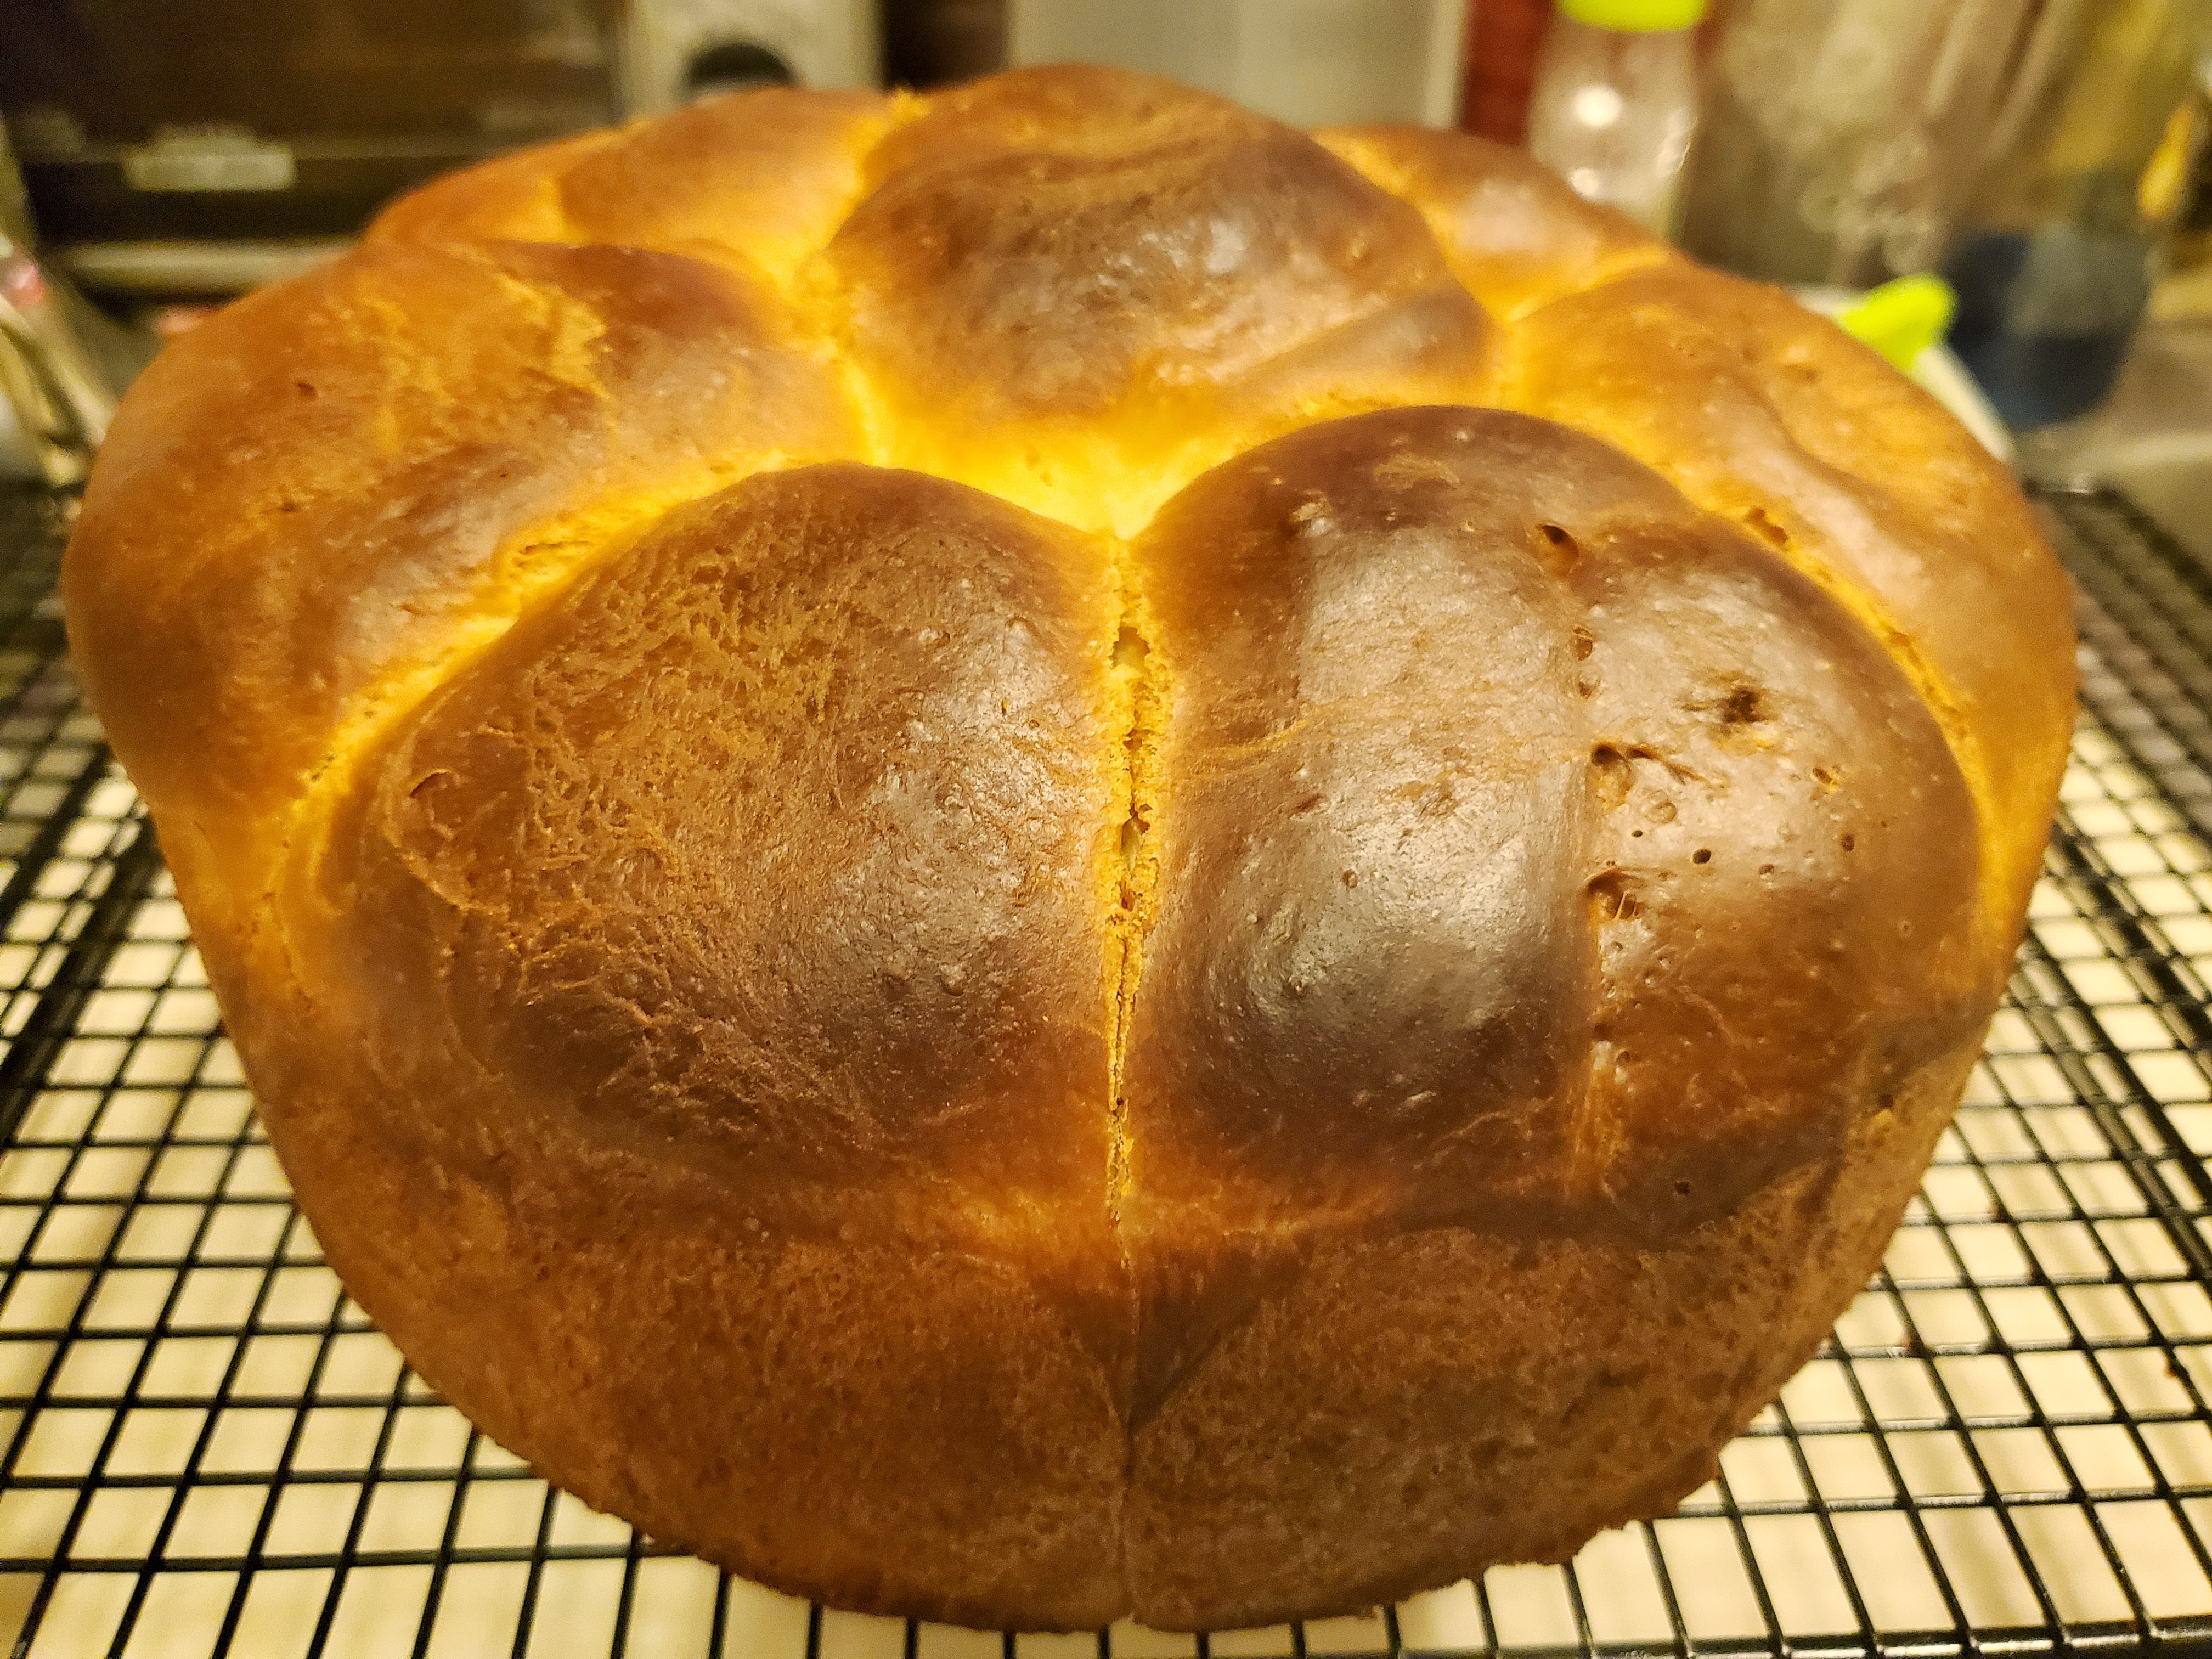
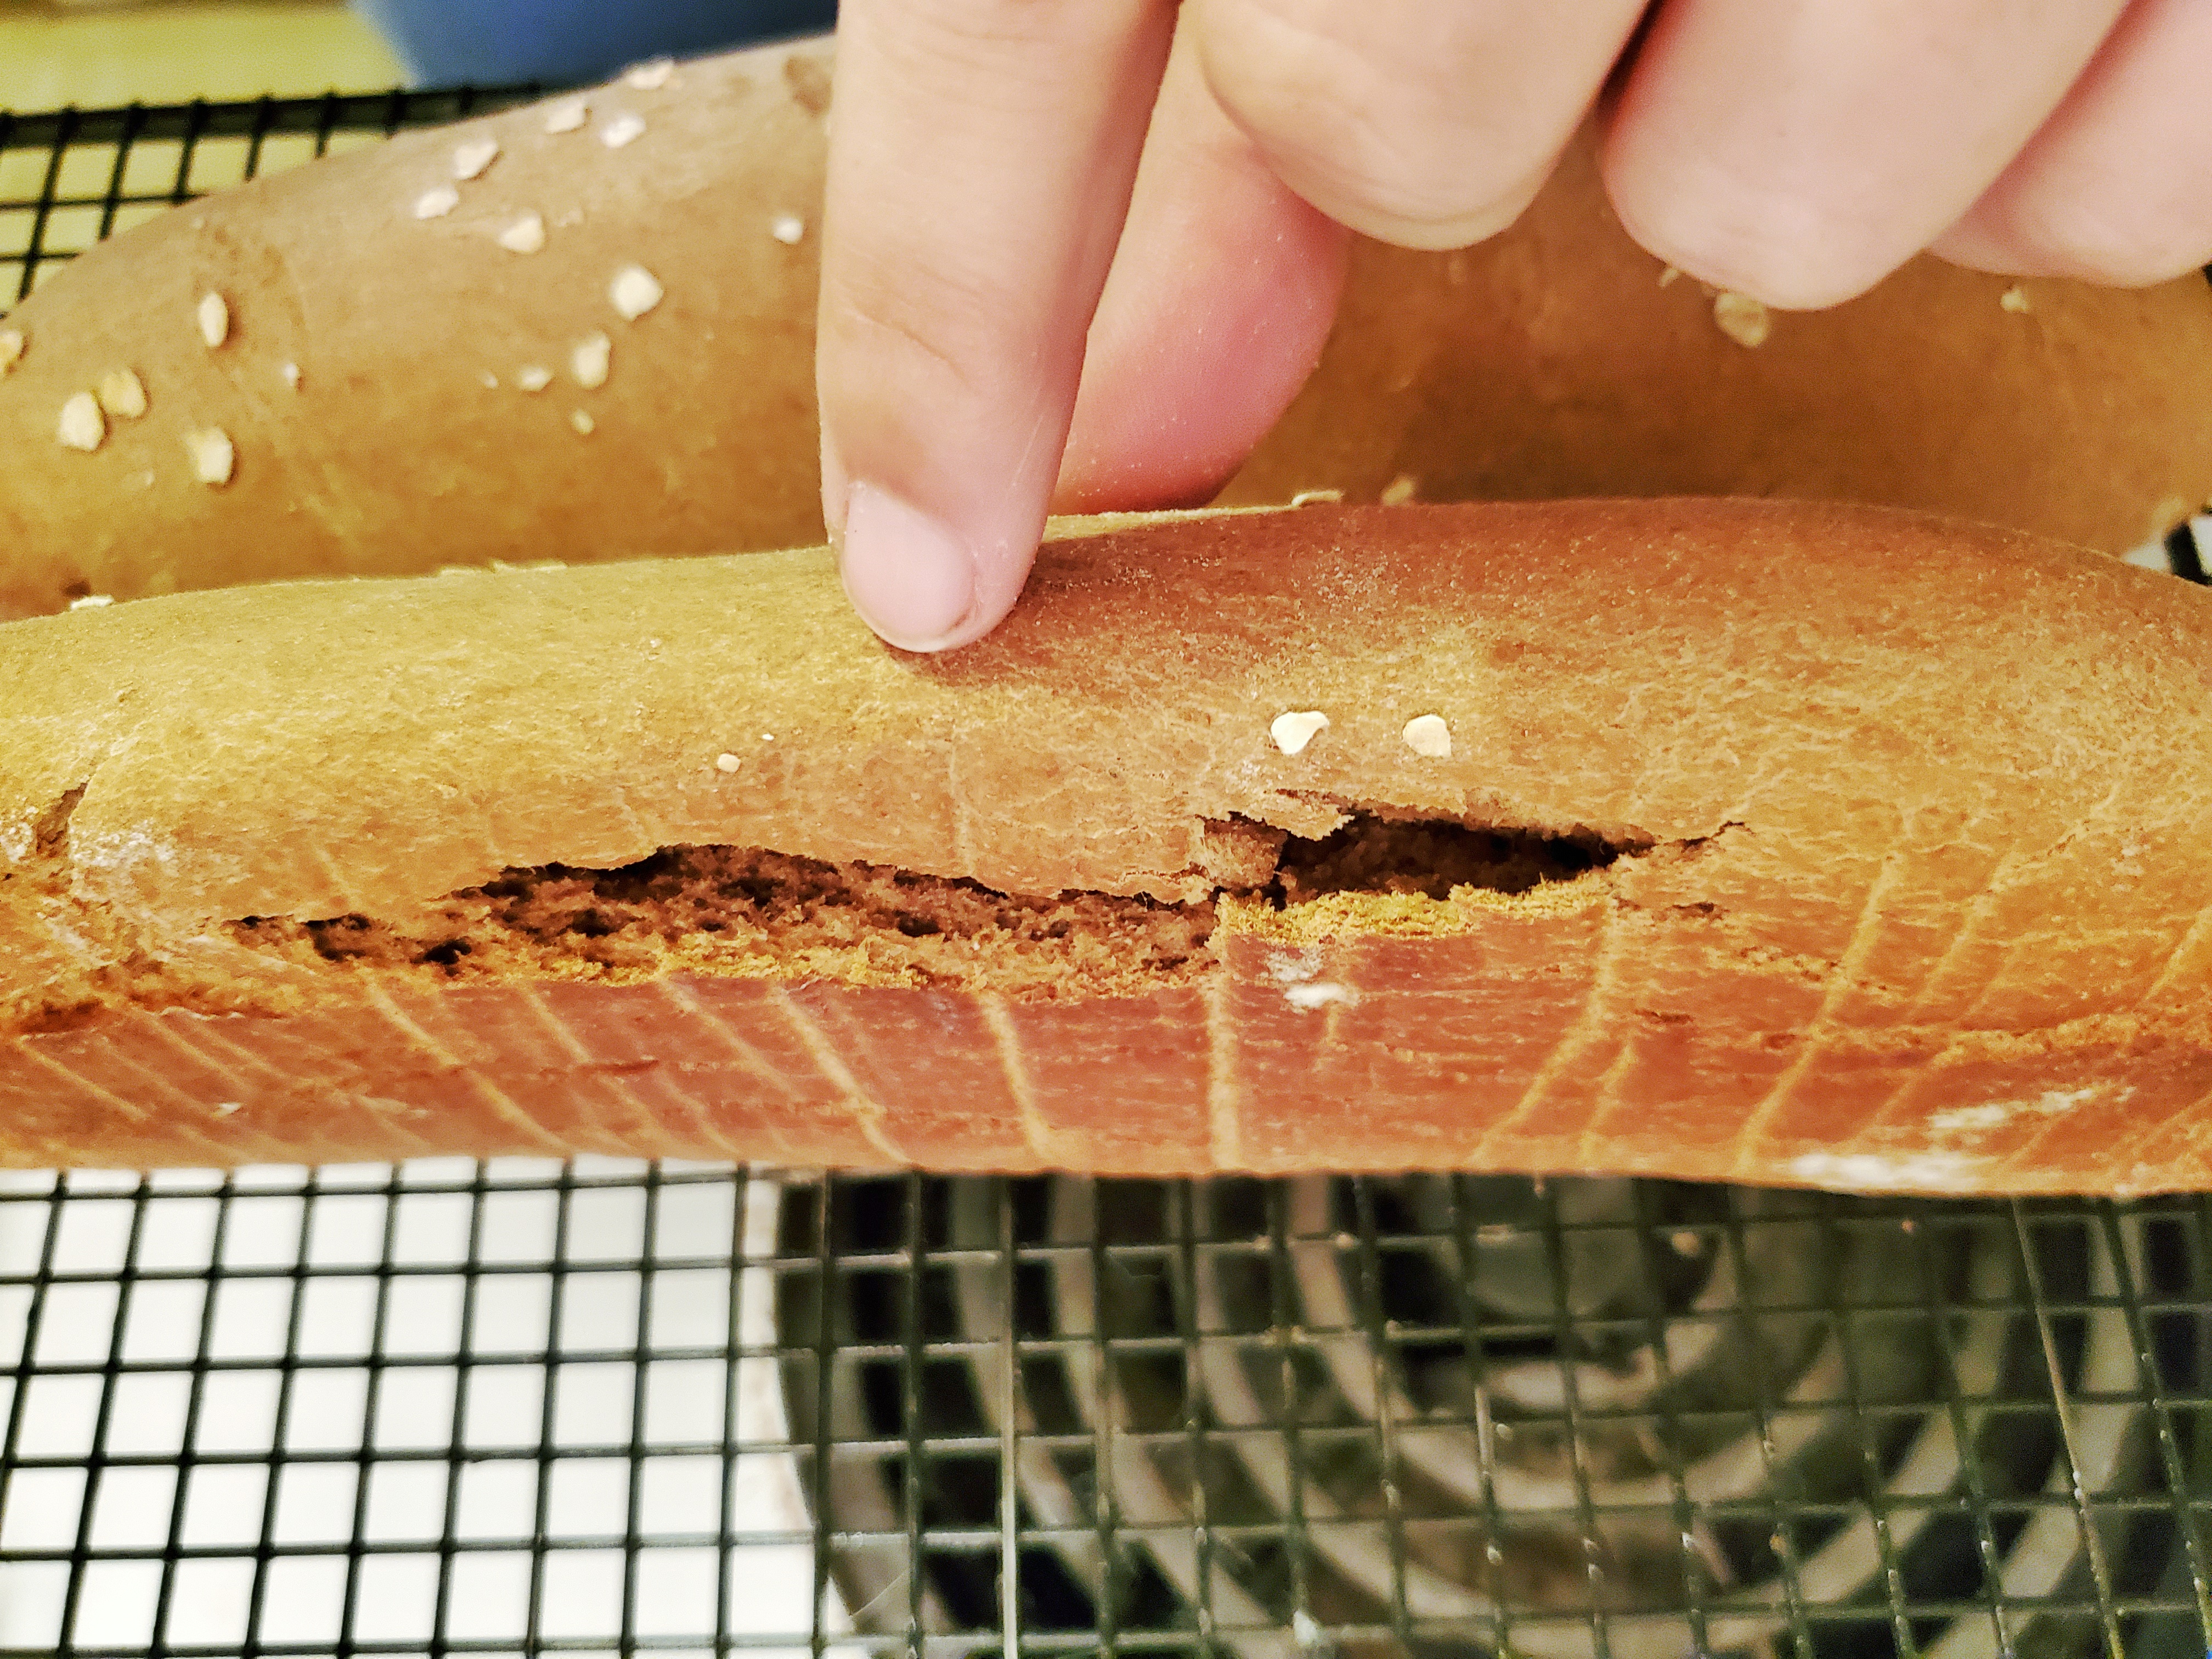
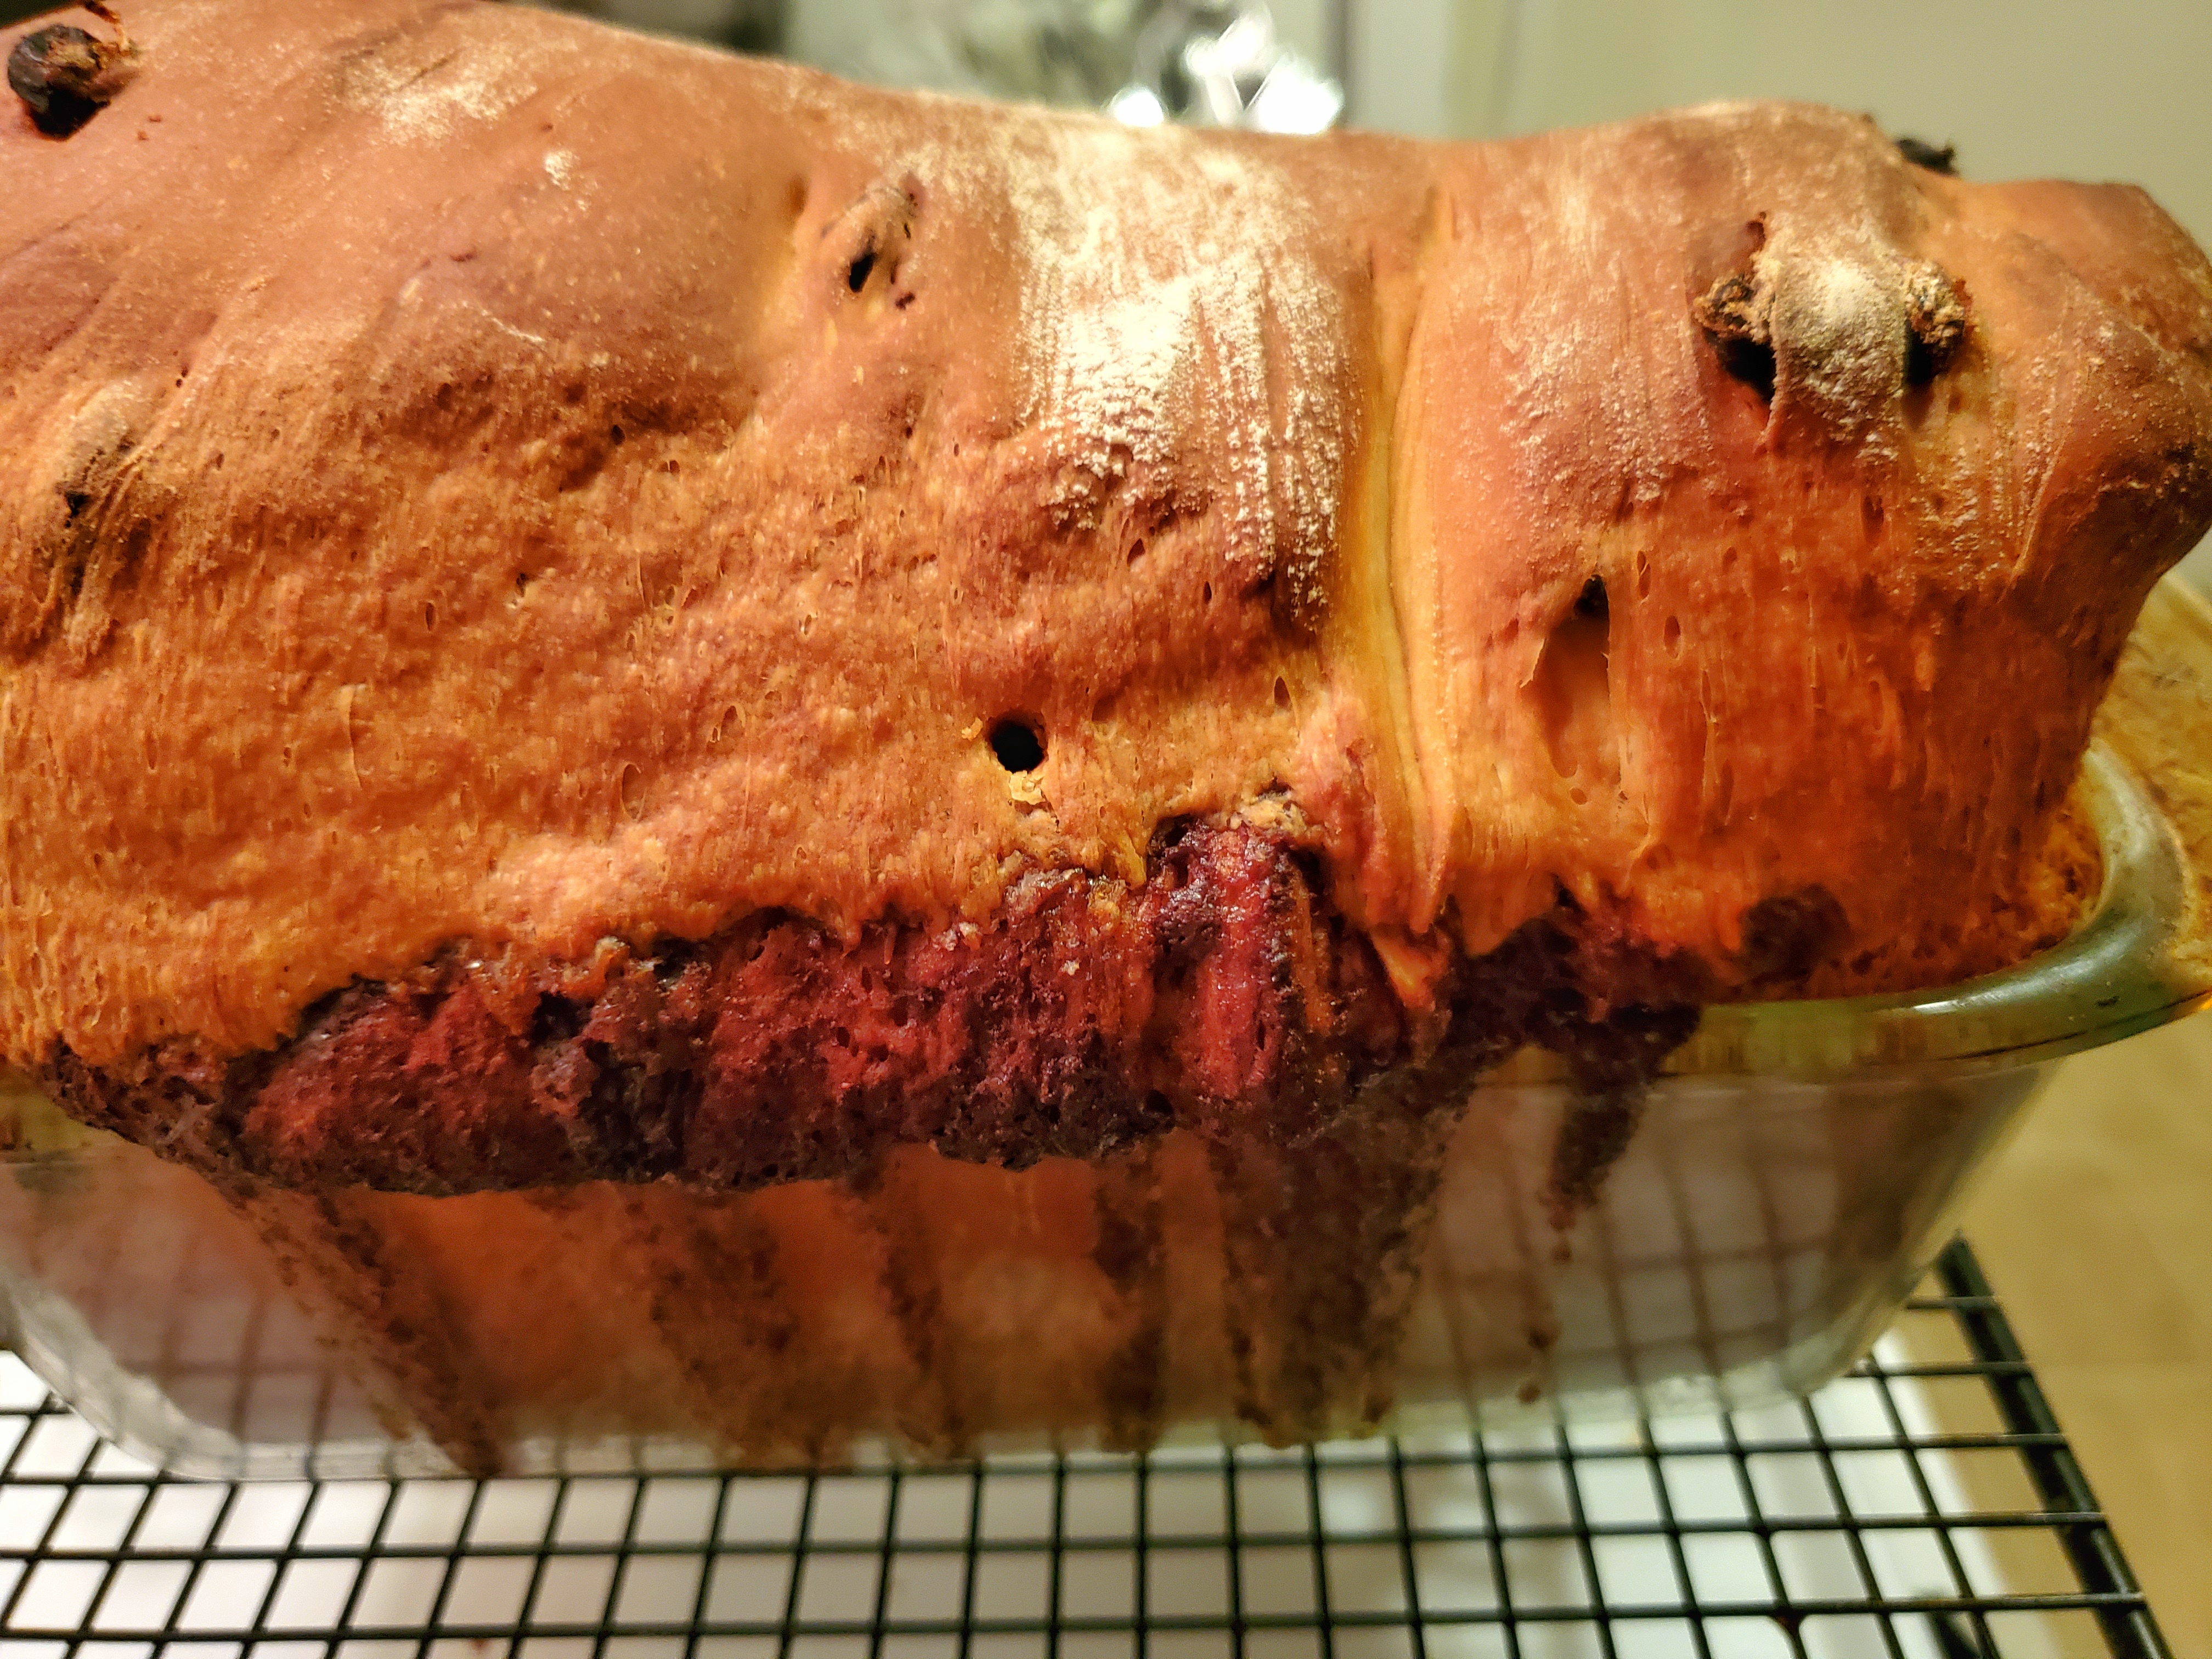
As you can see from this cinnamon swirl bread from The Pioneer Woman (which was delicious, by the way), the crust on it is very dark, which in of itself isn’t the only indicator that it’s burned, but look at the cross-section: the dark brown on the edge is too thick. The middle is near perfect – irregular holes, soft, fluffy – didn’t turn back to dough when I poked it, which is always a good sign. The only bad this has that as I cut nearer the center, the gaps from the cinnamon swirl began to get rather bigger (but that’s another issue I’ll discuss later).

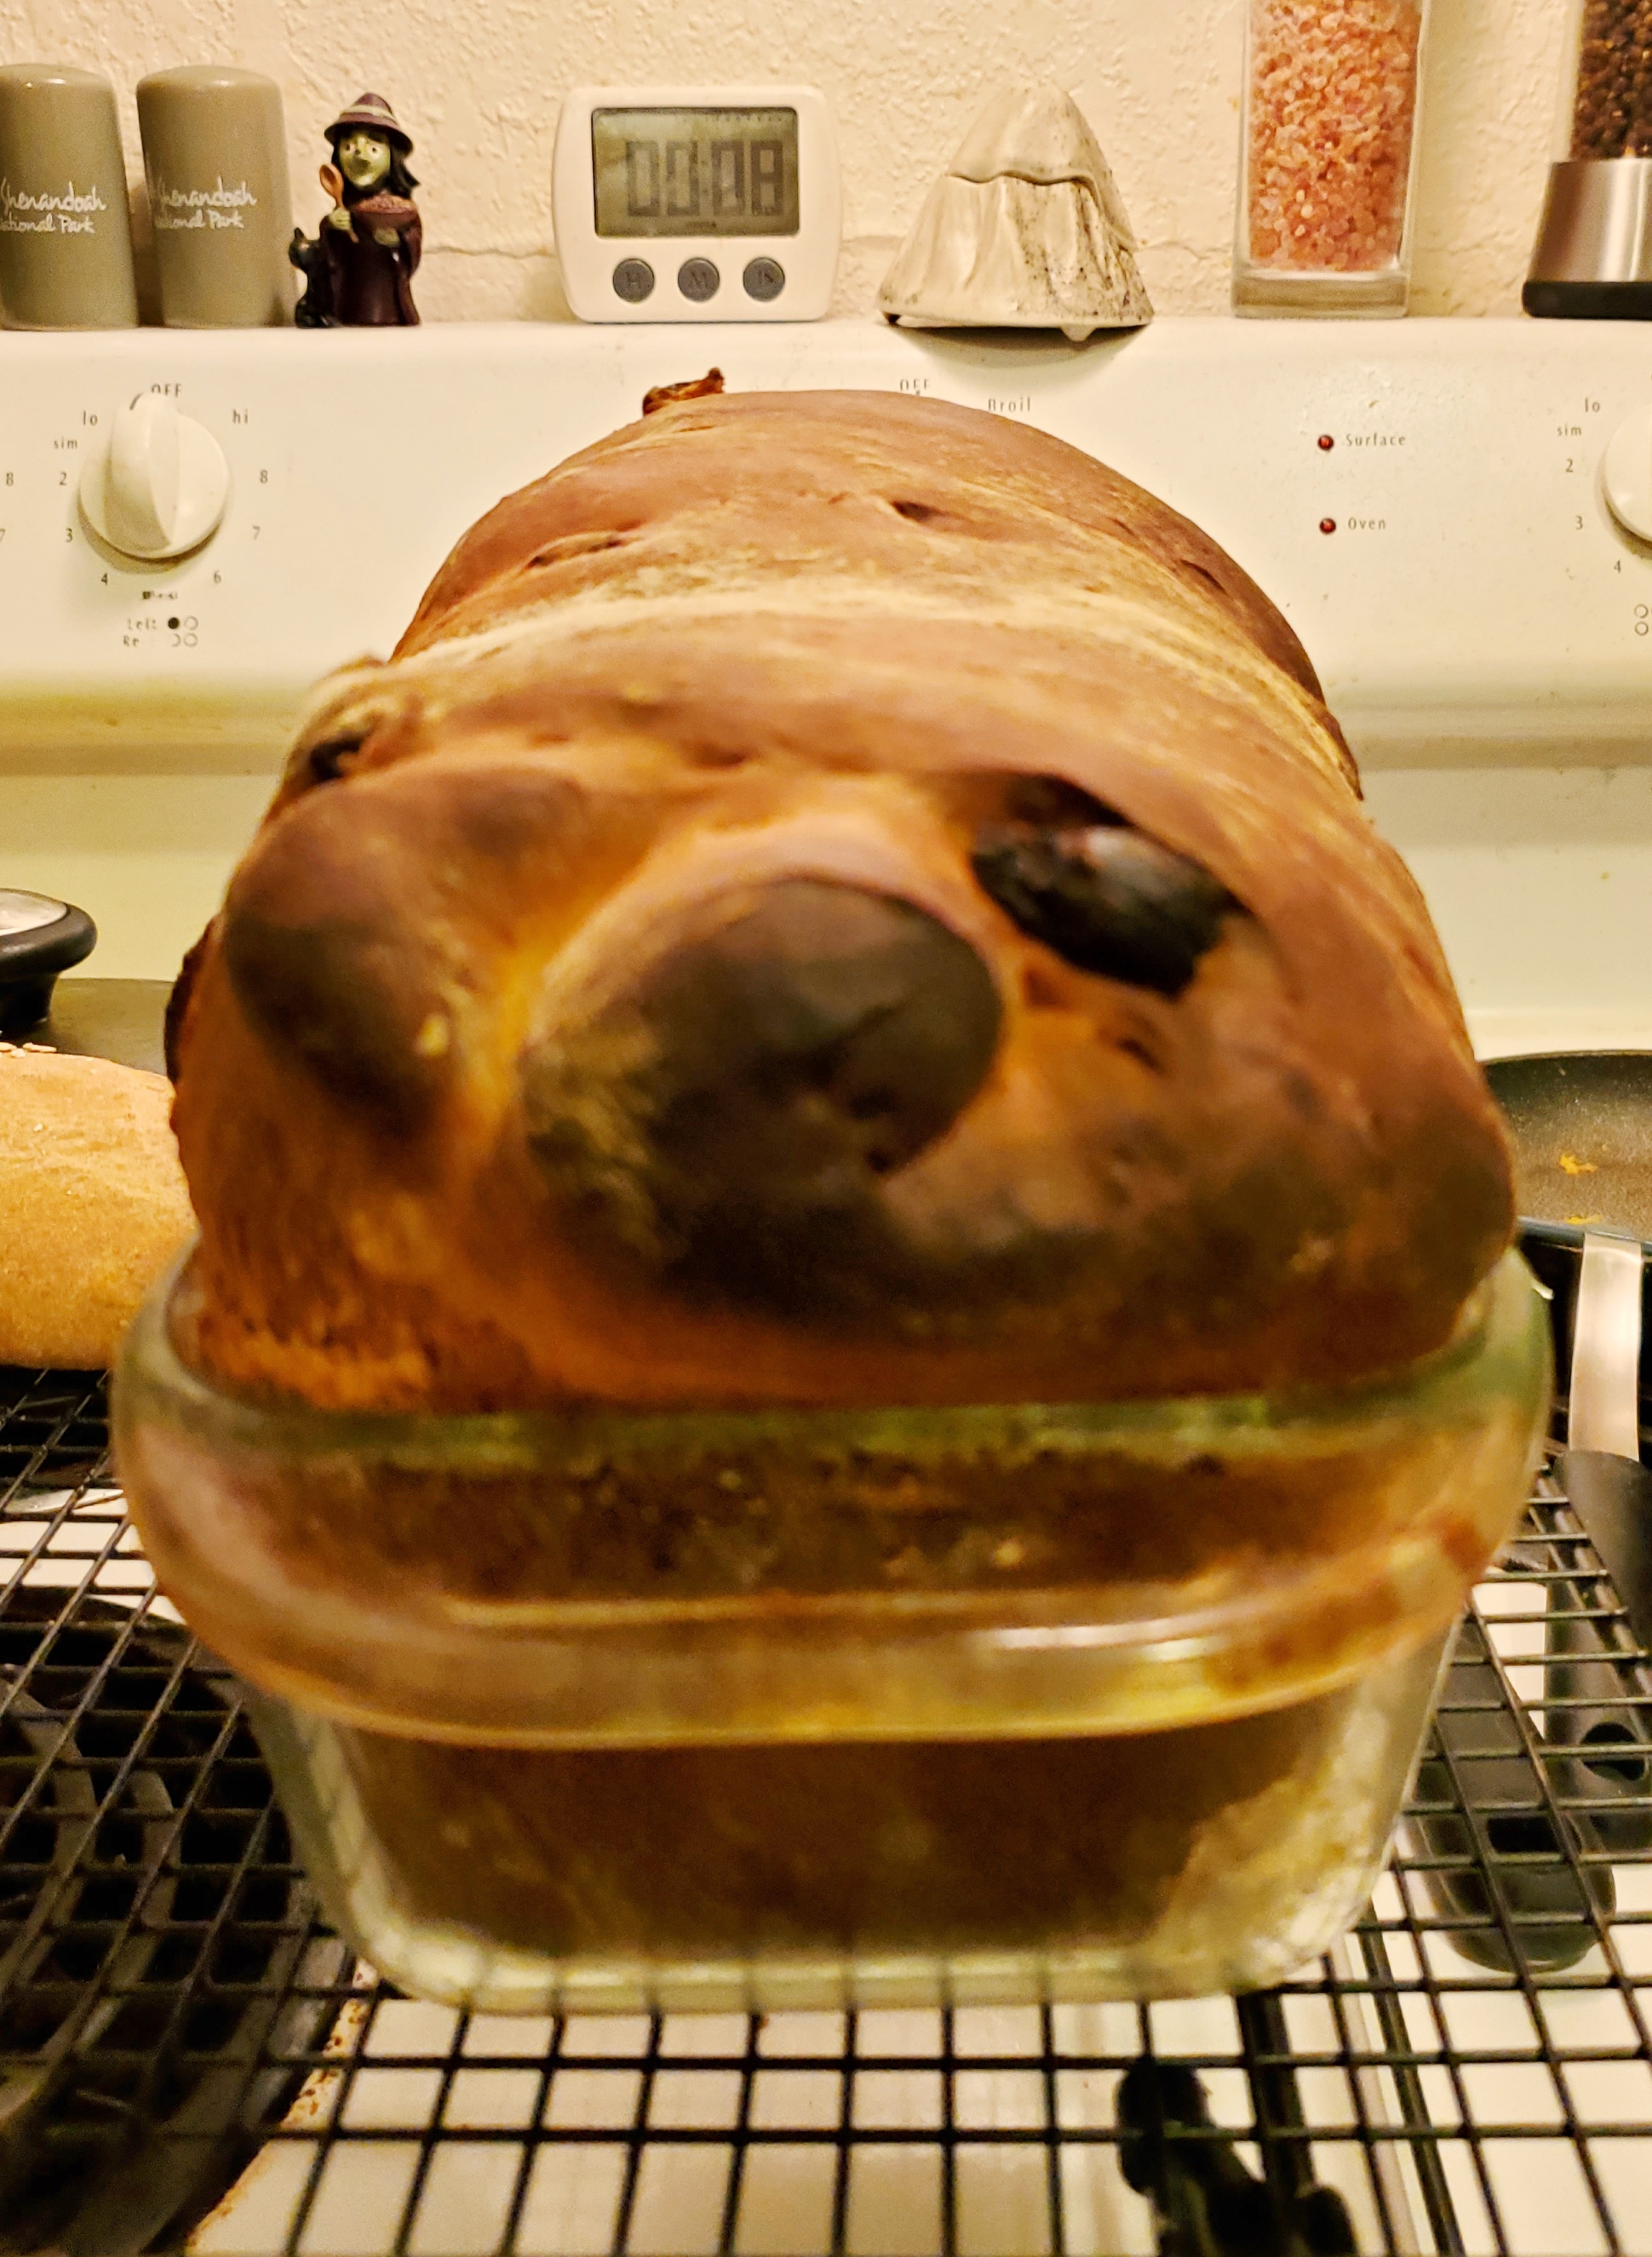
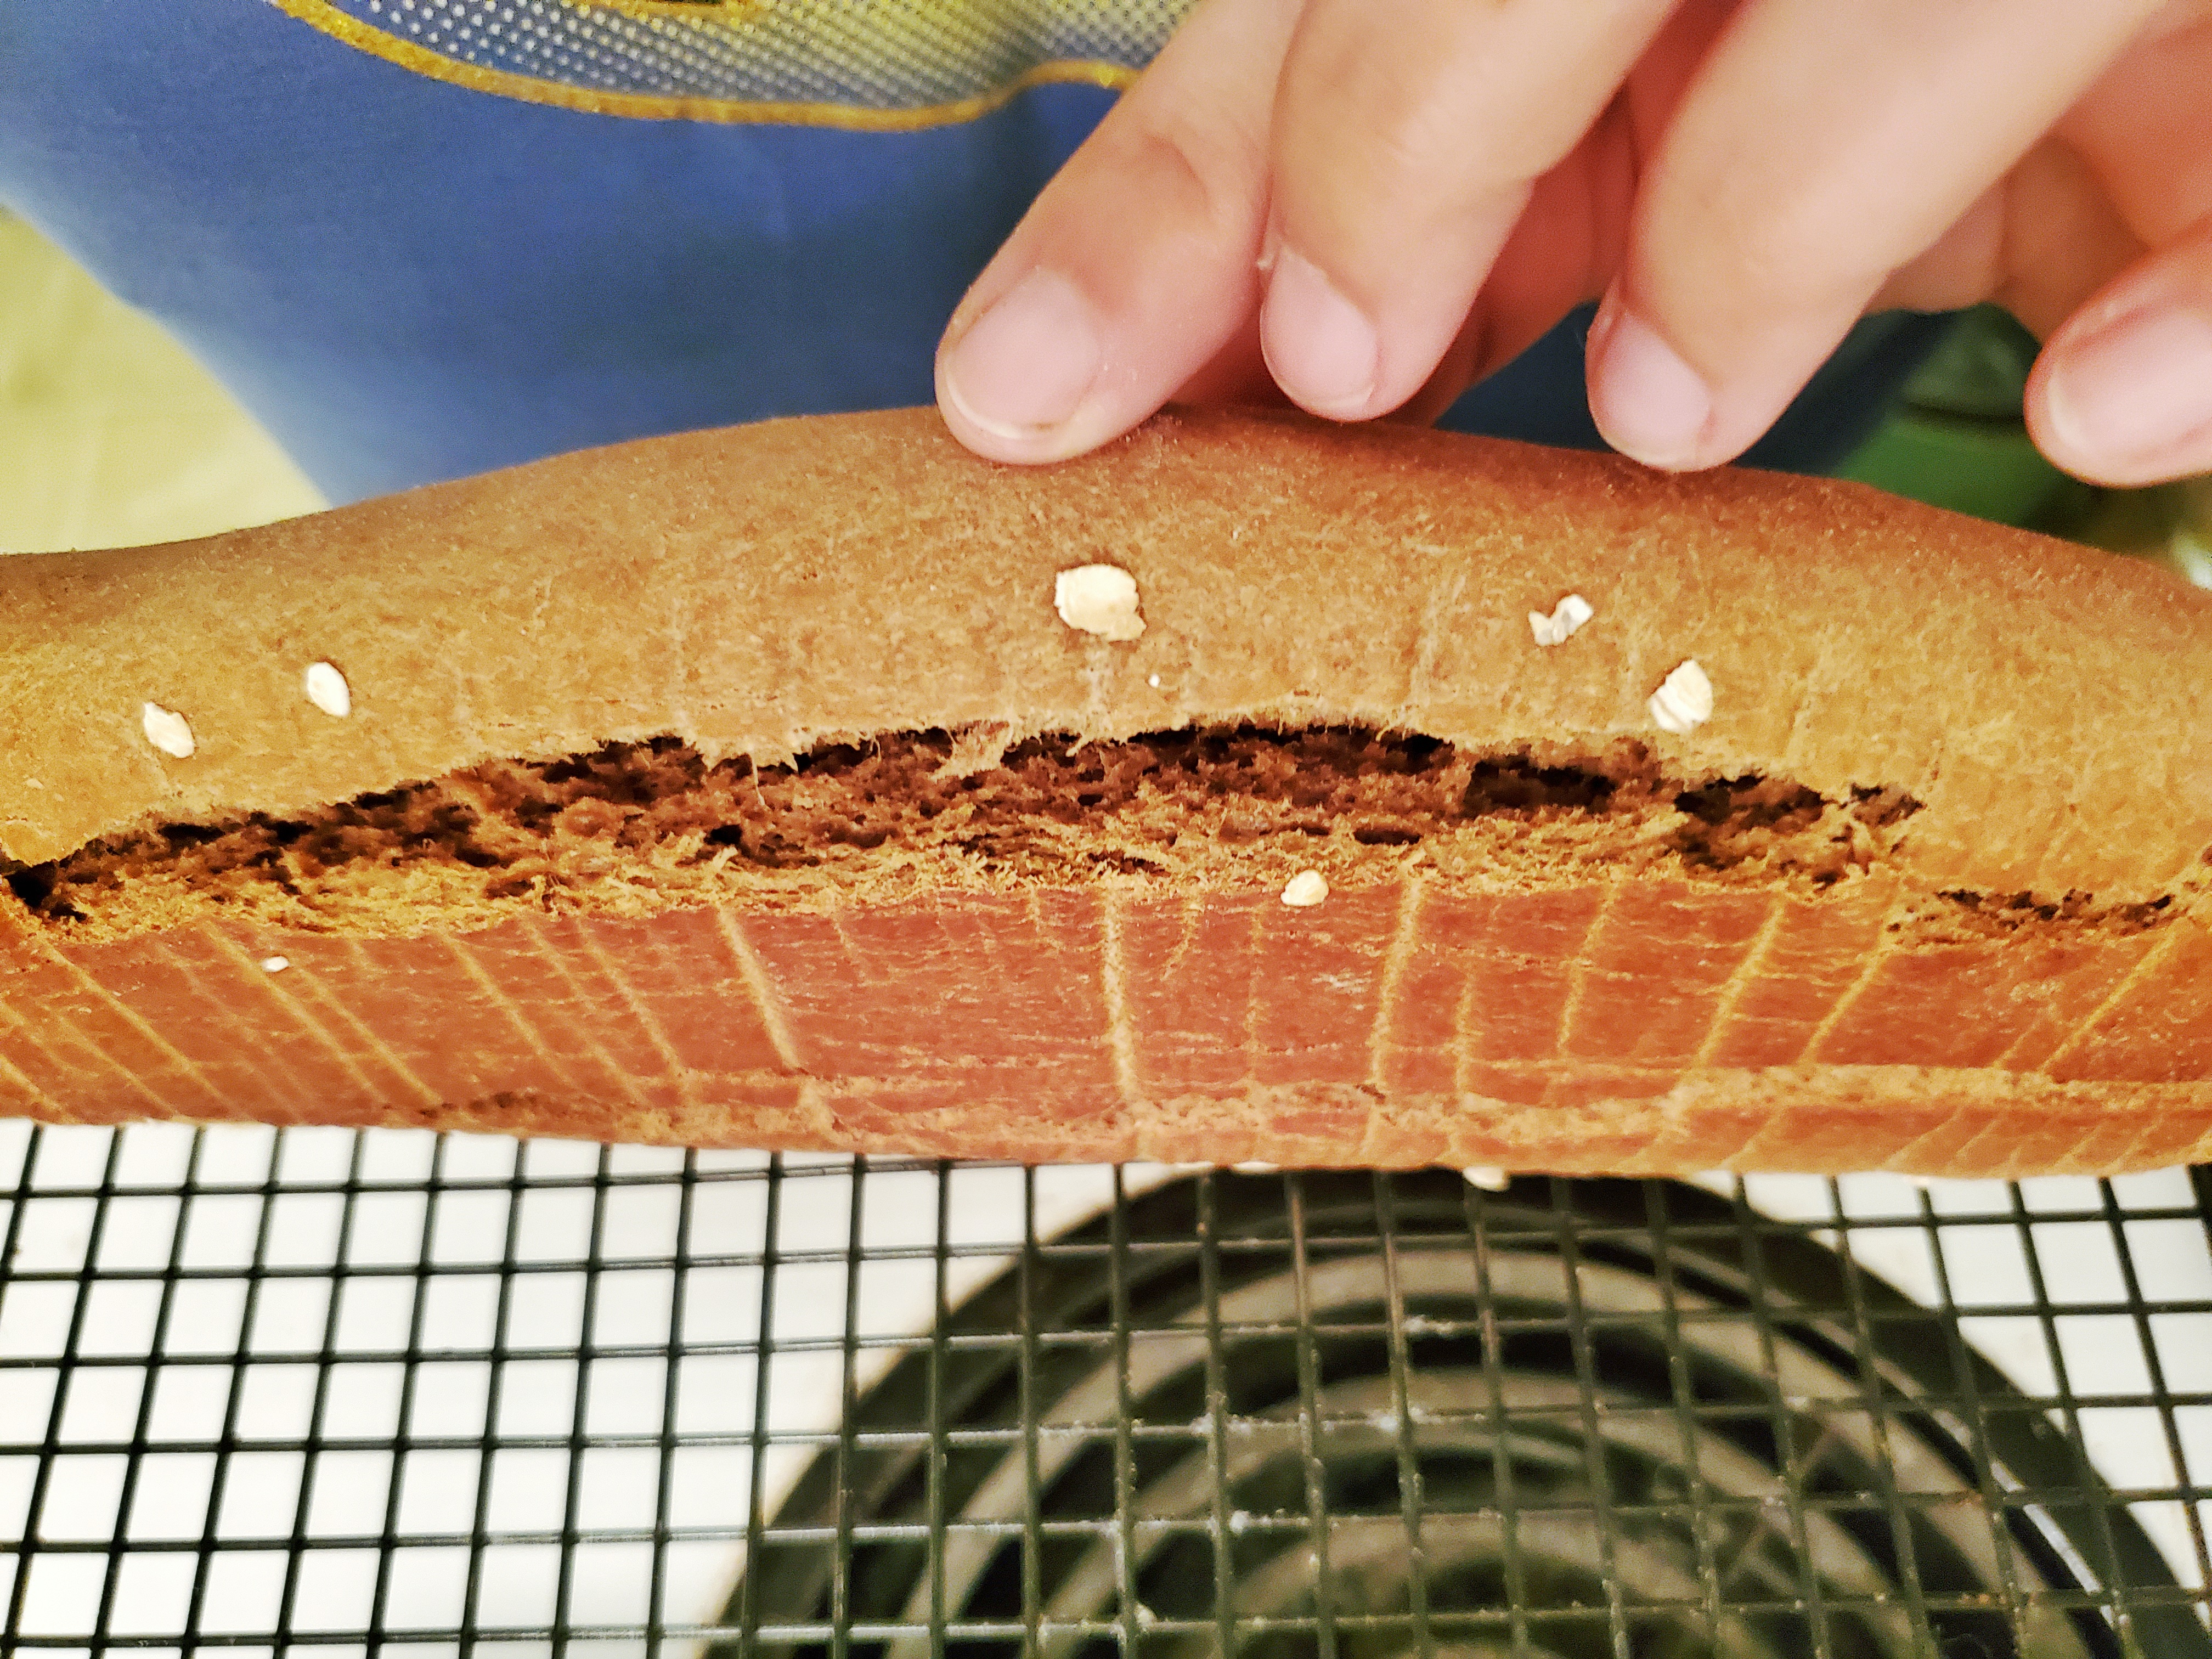
This also happened to this brioche I made a week or two earlier:

The high sugar content in brioche means the outside does brown quickly, but the harder, thicker crust on the loaf I made is also due to my oven heating unevenly!

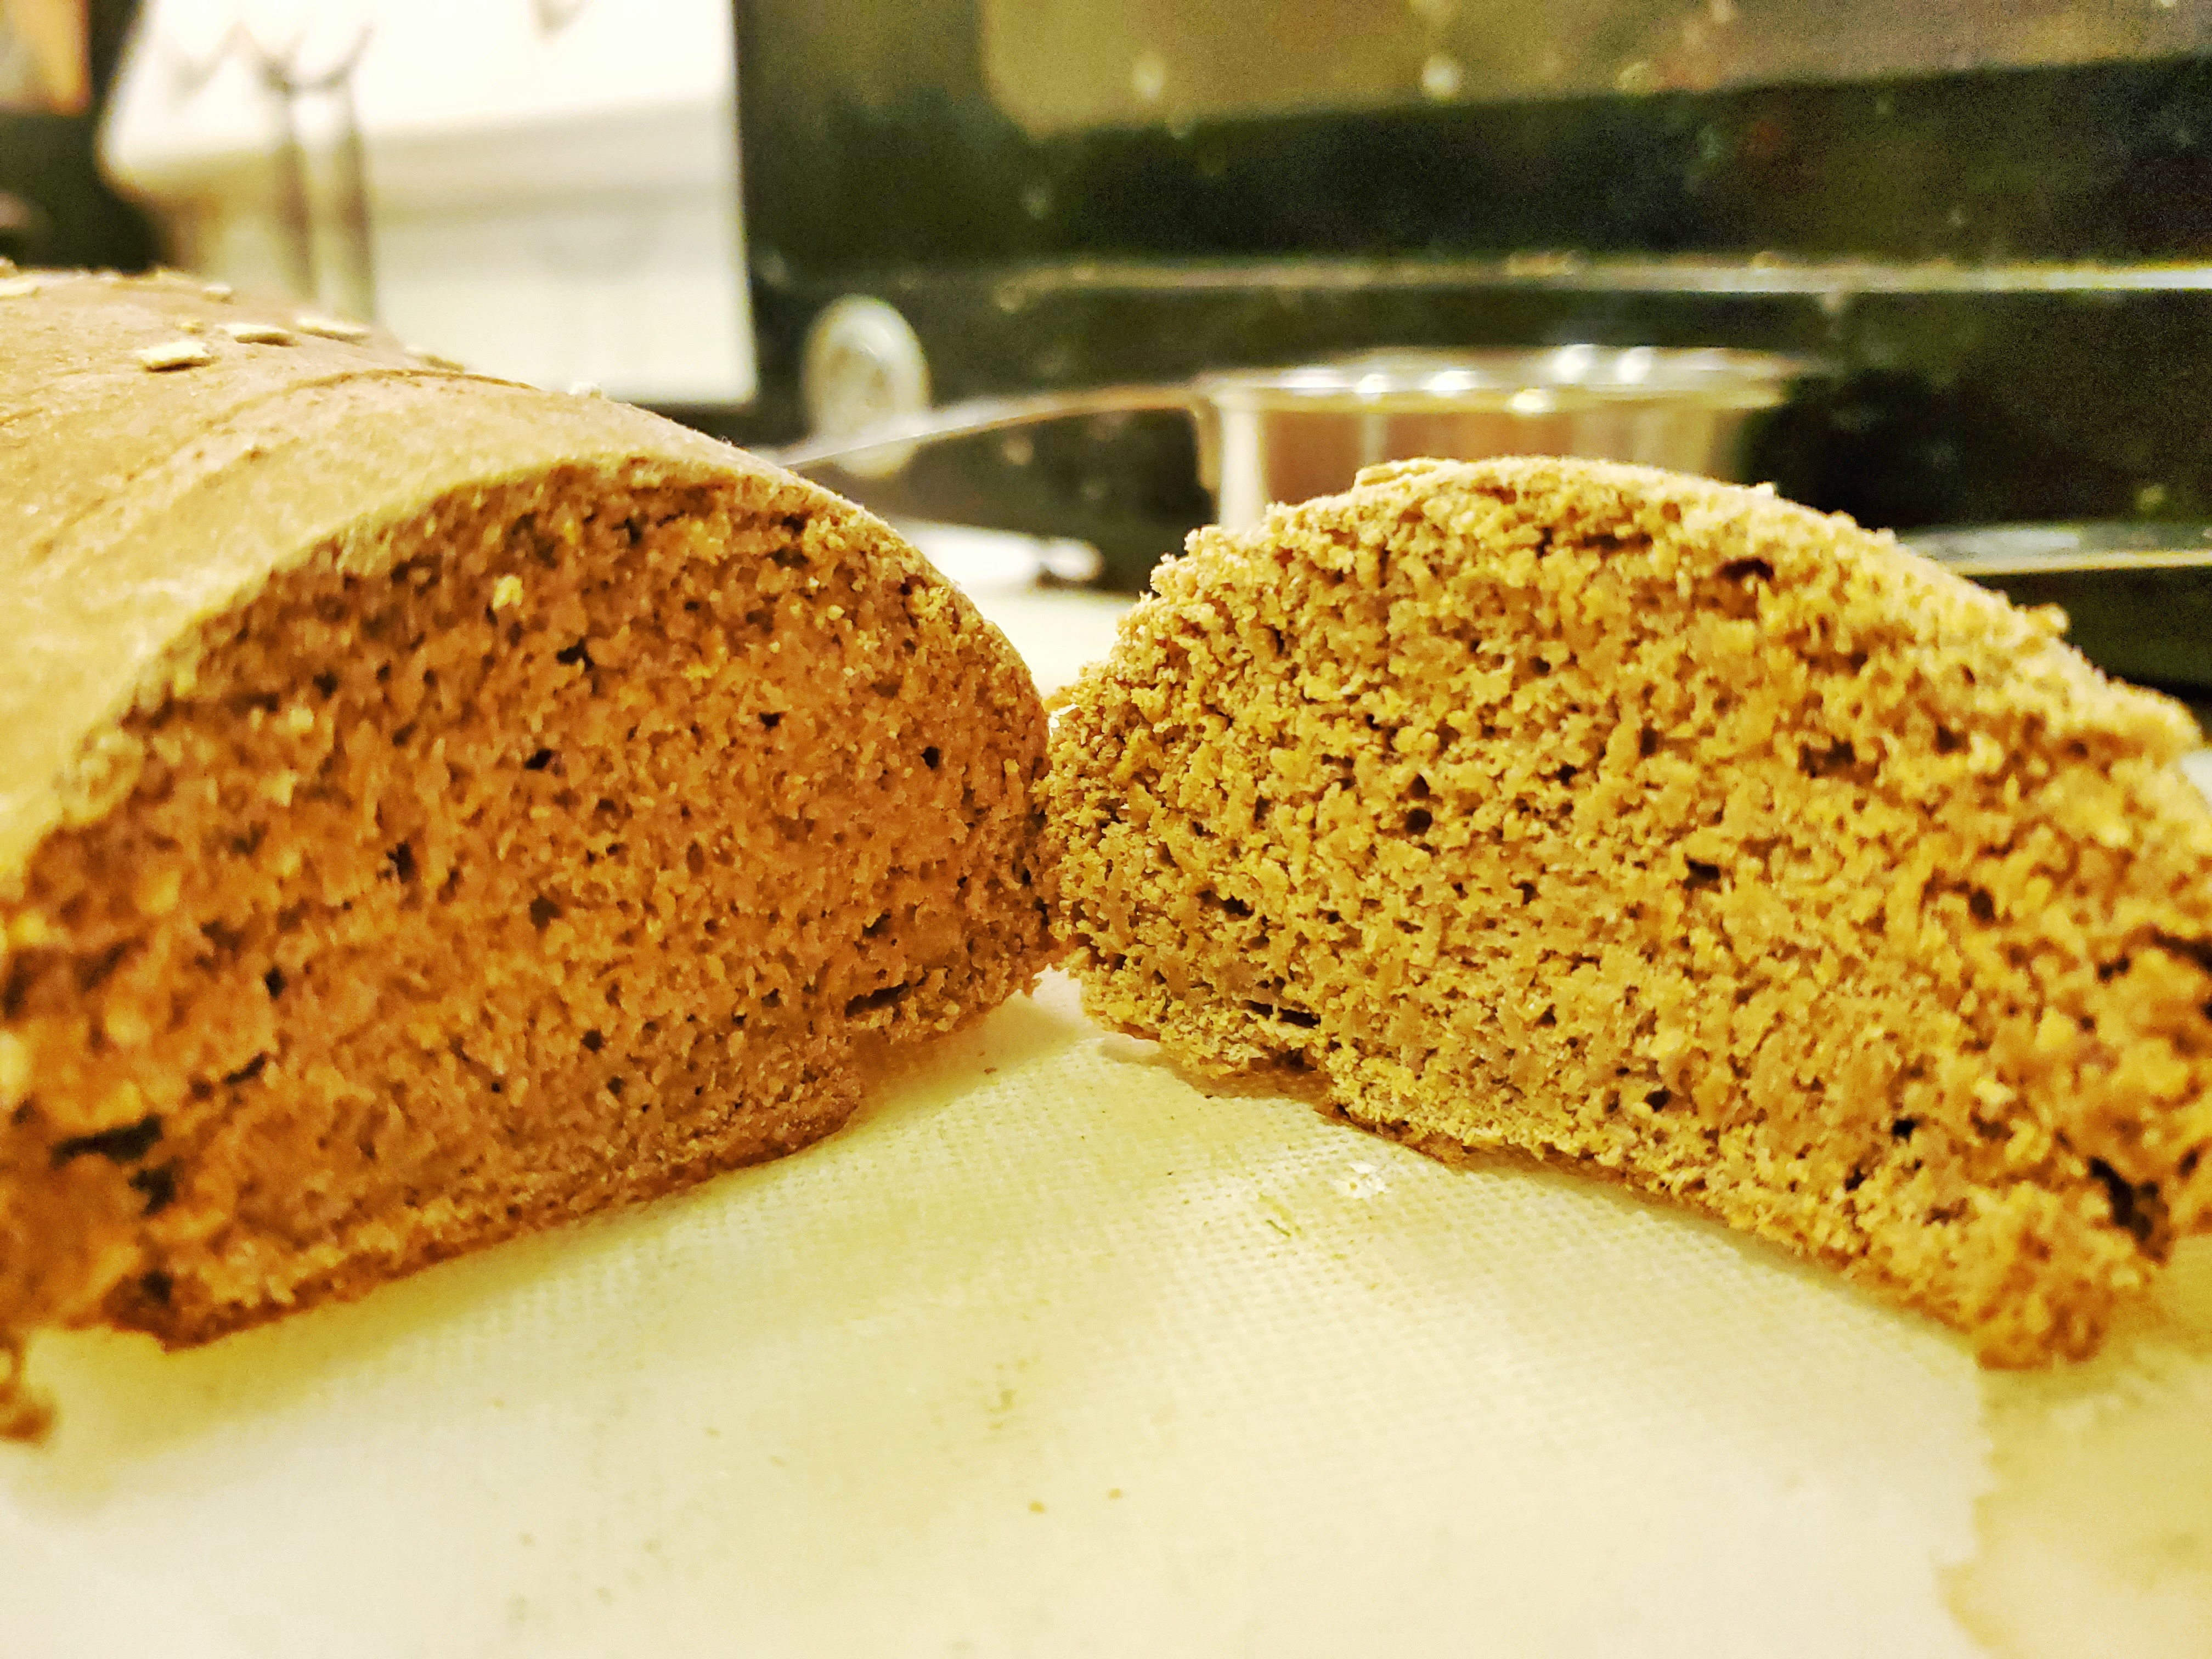
And this cobbled loaf (which was ALSO delicious):

This is an orange-cardamom and chocolate tear and share, with dark chocolate and white chocolate fillings respectively. Delicious!

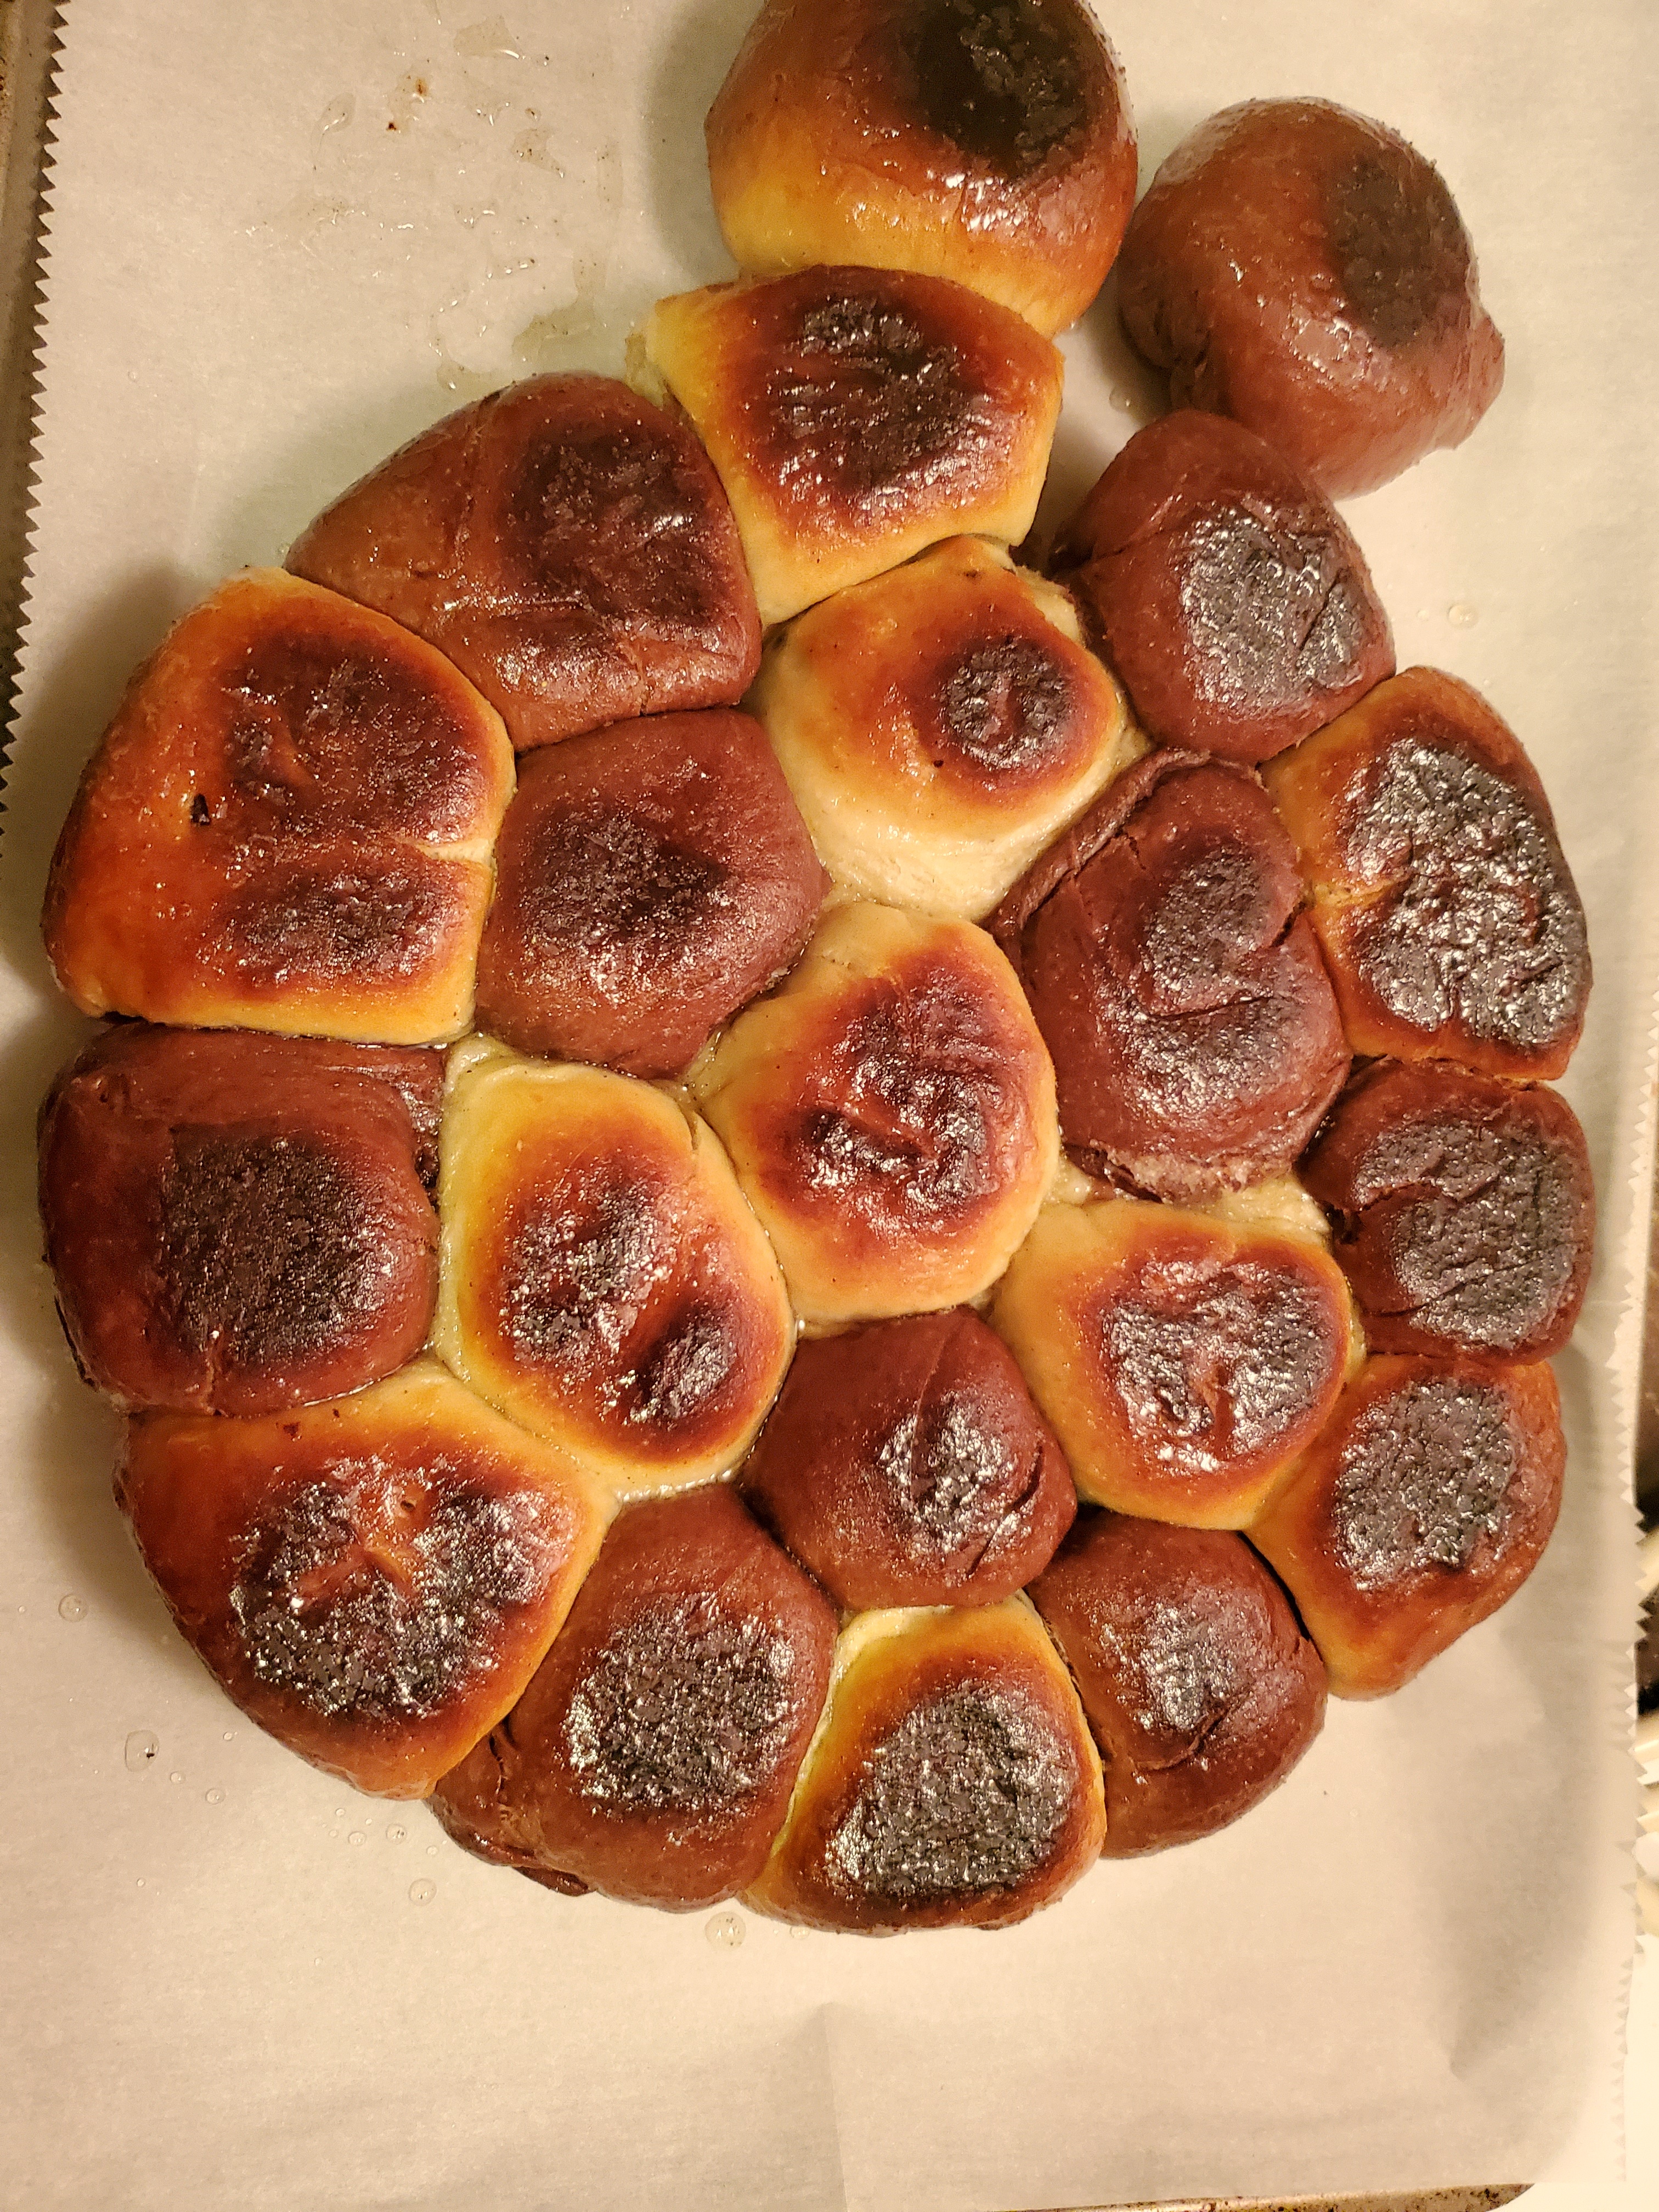
I honestly shouldn’t have followed the directions to flip the bread and bake it upside down. I’m not exactly sure what that purpose was, anyway, since it would squish the puffy top, but I did it any way, and burned the tops of the little buns. :( It was super-tasty, though! I actually loved the chocolate bread with the white chocolate middle, which I was unsure about, because I only like white chocolate in very small amounts. But there it is – both the bottom and the top were a little crispy, on what was otherwise, a pretty decent bake. Darn oven.

UNDER PROVING

Okay, so this case is one of Raven being a dumb-dumb. I simply misread the recipe.

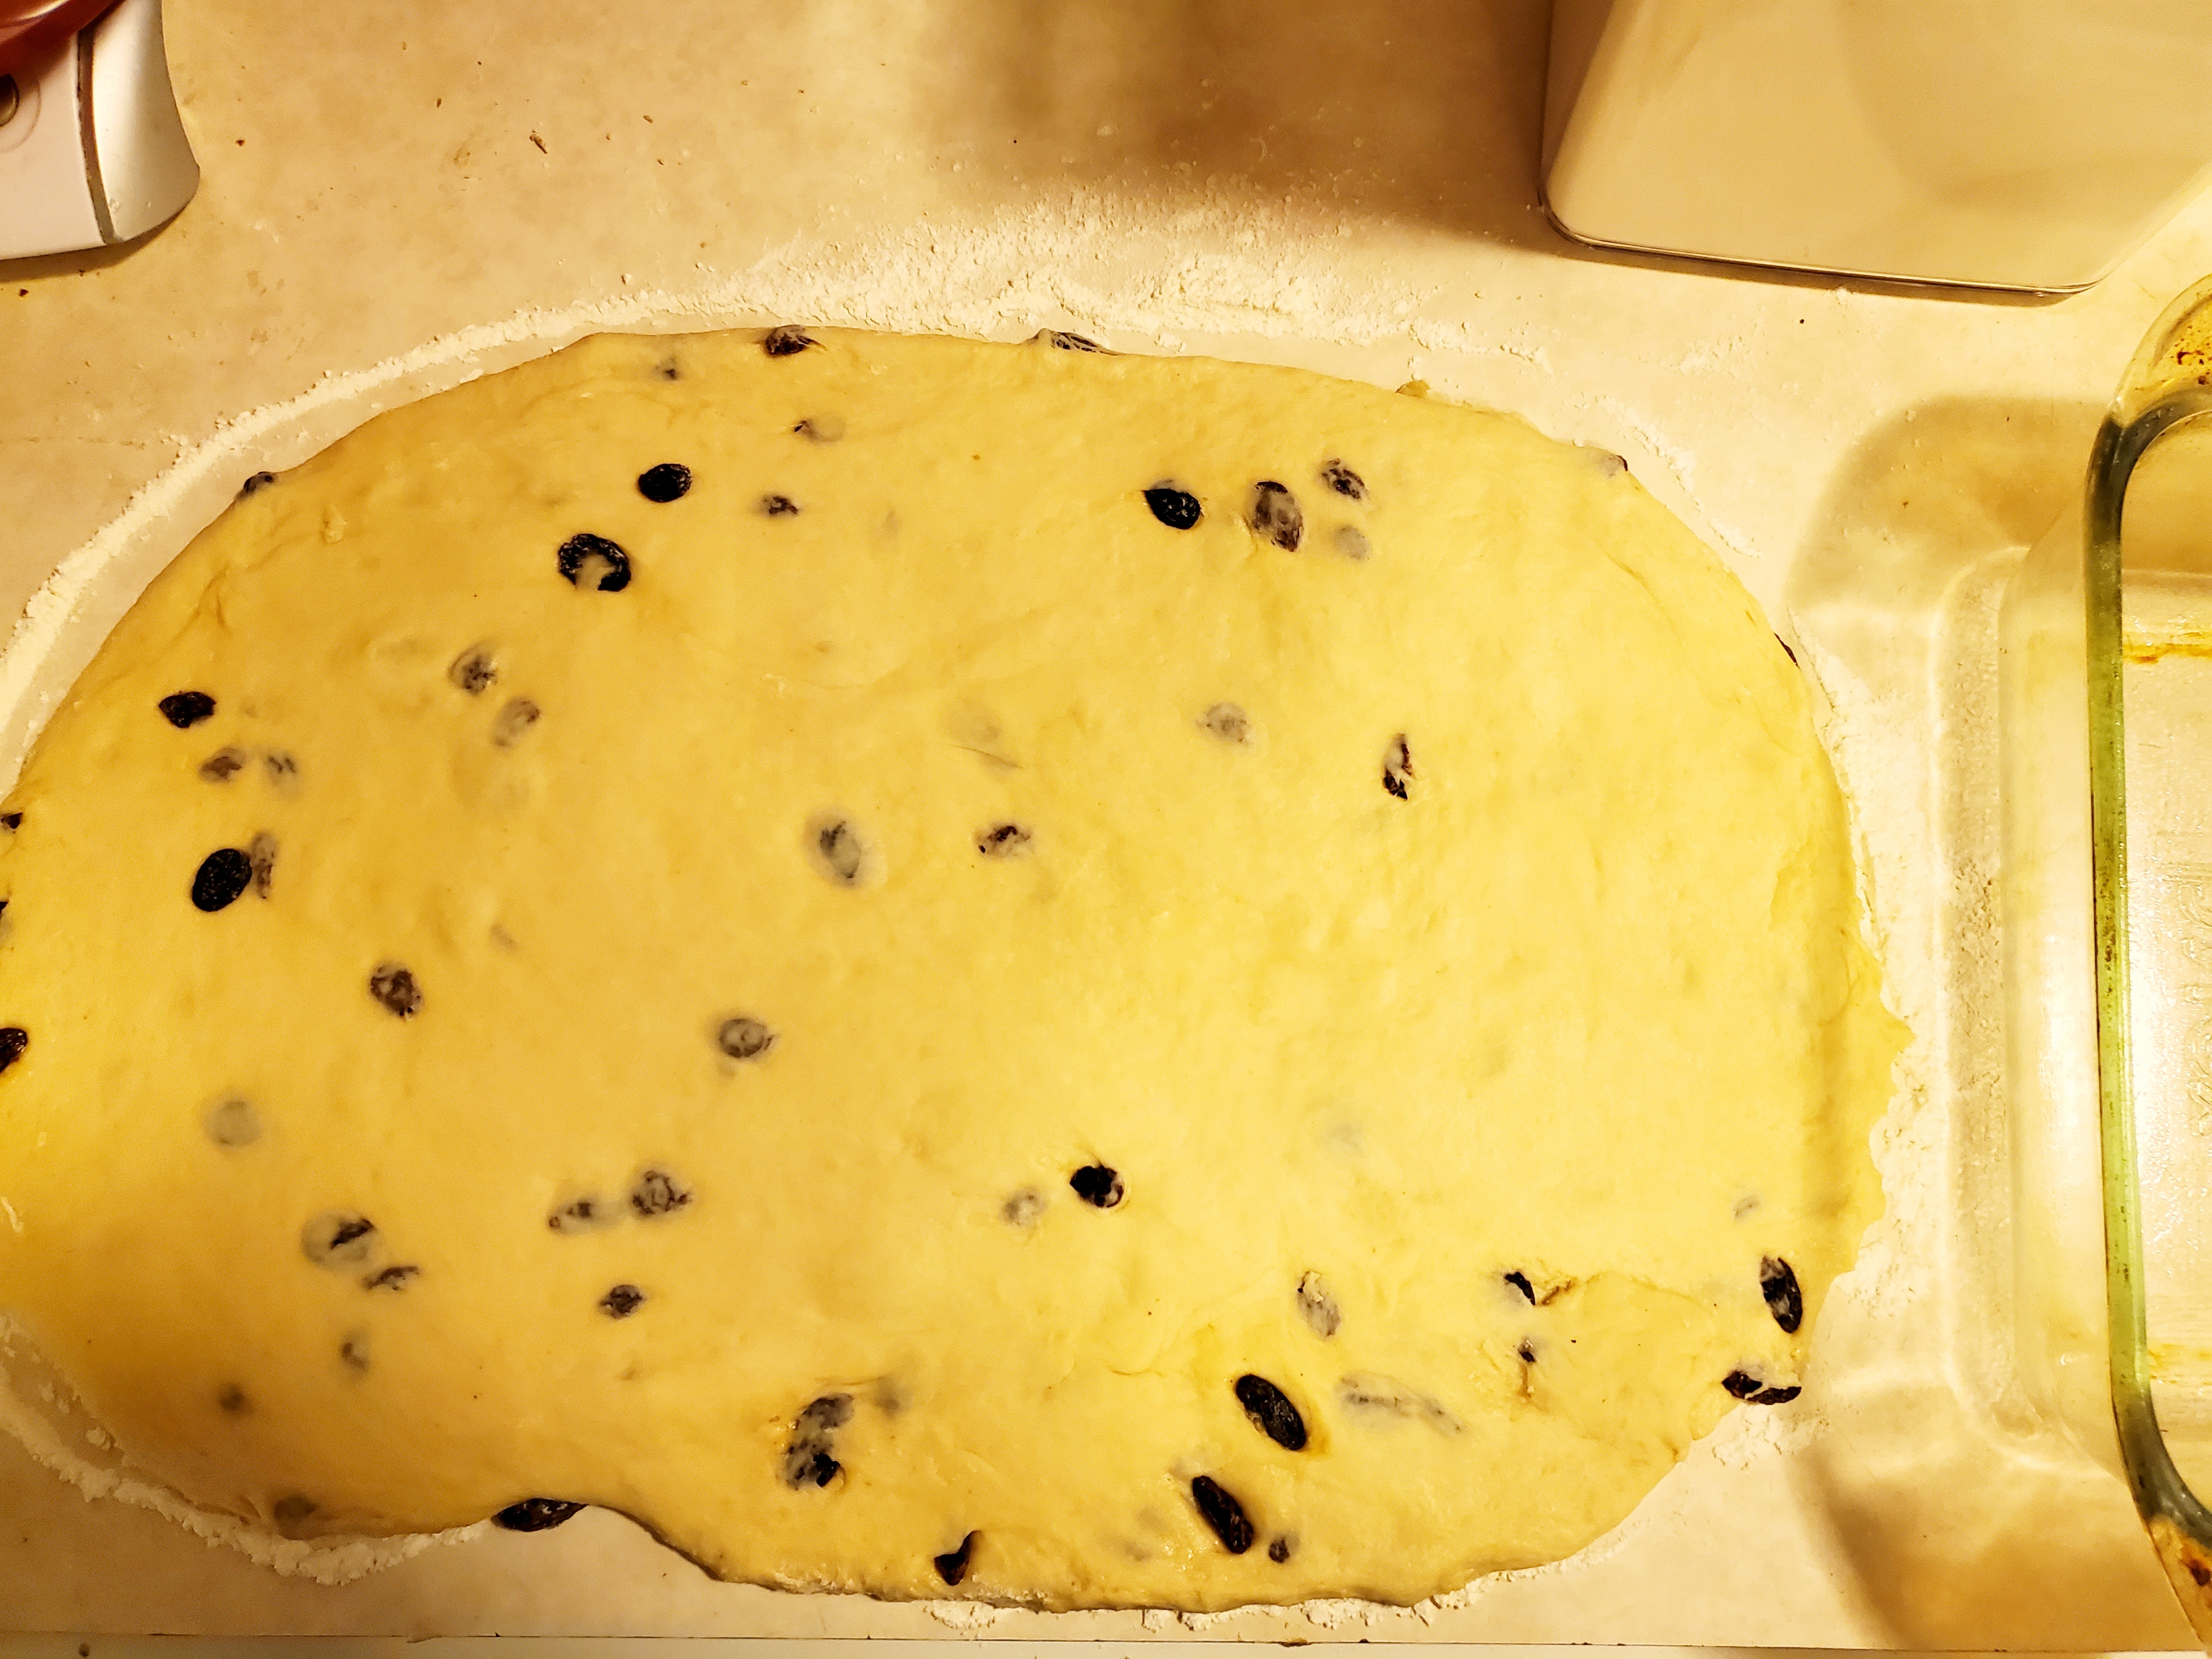
I was trying to make a replication of The Cheesecake Factory’s brown bread, which they serve as you’re waiting for your food. I think in my brain, I always saw this bread as Pumpernickel, which it is NOT, at all. I’ve had Pumpernickel, so I’m not sure why I thought it was, but anyway, my roommate found a take and bake of The Cheesecake Factory brown bread, and I spent some time trying to figure out the flavor profile, which I had never really paid attention to before. Though, to be fair, I don’t really remember the last time I went to The Cheesecake Factory. I found a few recipes online, and went ahead and tried one. I thought it turned out well, though it wasn’t as dark as I knew it should be (though I think that’s because TCF adds coloring).

Slightly sweet brown bread loaves topped with oats.

Alas, I was mistaken about how well it’s baked. It tastes about right, BUT, the bottom blew out. D:

I knew this was an indication of messing up the proving, but I wasn’t sure exactly how, so a quick Google told me that a blow out on bread usually means it was under-proved. Basically, the yeast had quite a bit more work to do, and when I put it in the oven, the skin started to harden, and all that gas from the Yeasty Boys had to go somewhere…so it found the weakest place: the bottom.

I checked the recipe, and it turns out that 30-minute proving time was actually supposed to be TWO HOURS. *facepalm* Well, that explains it! It also explains why it was so dense in the middle.

Close textured, but tasty loaf. Unfortunately, it kind of turns to glue in the mouth. :(

So, I’m going to try this again, swapping the honey out for more molasses, and see if I can keep the taste and get the color I want as well. AND the texture!

NOT ENOUGH ROOM

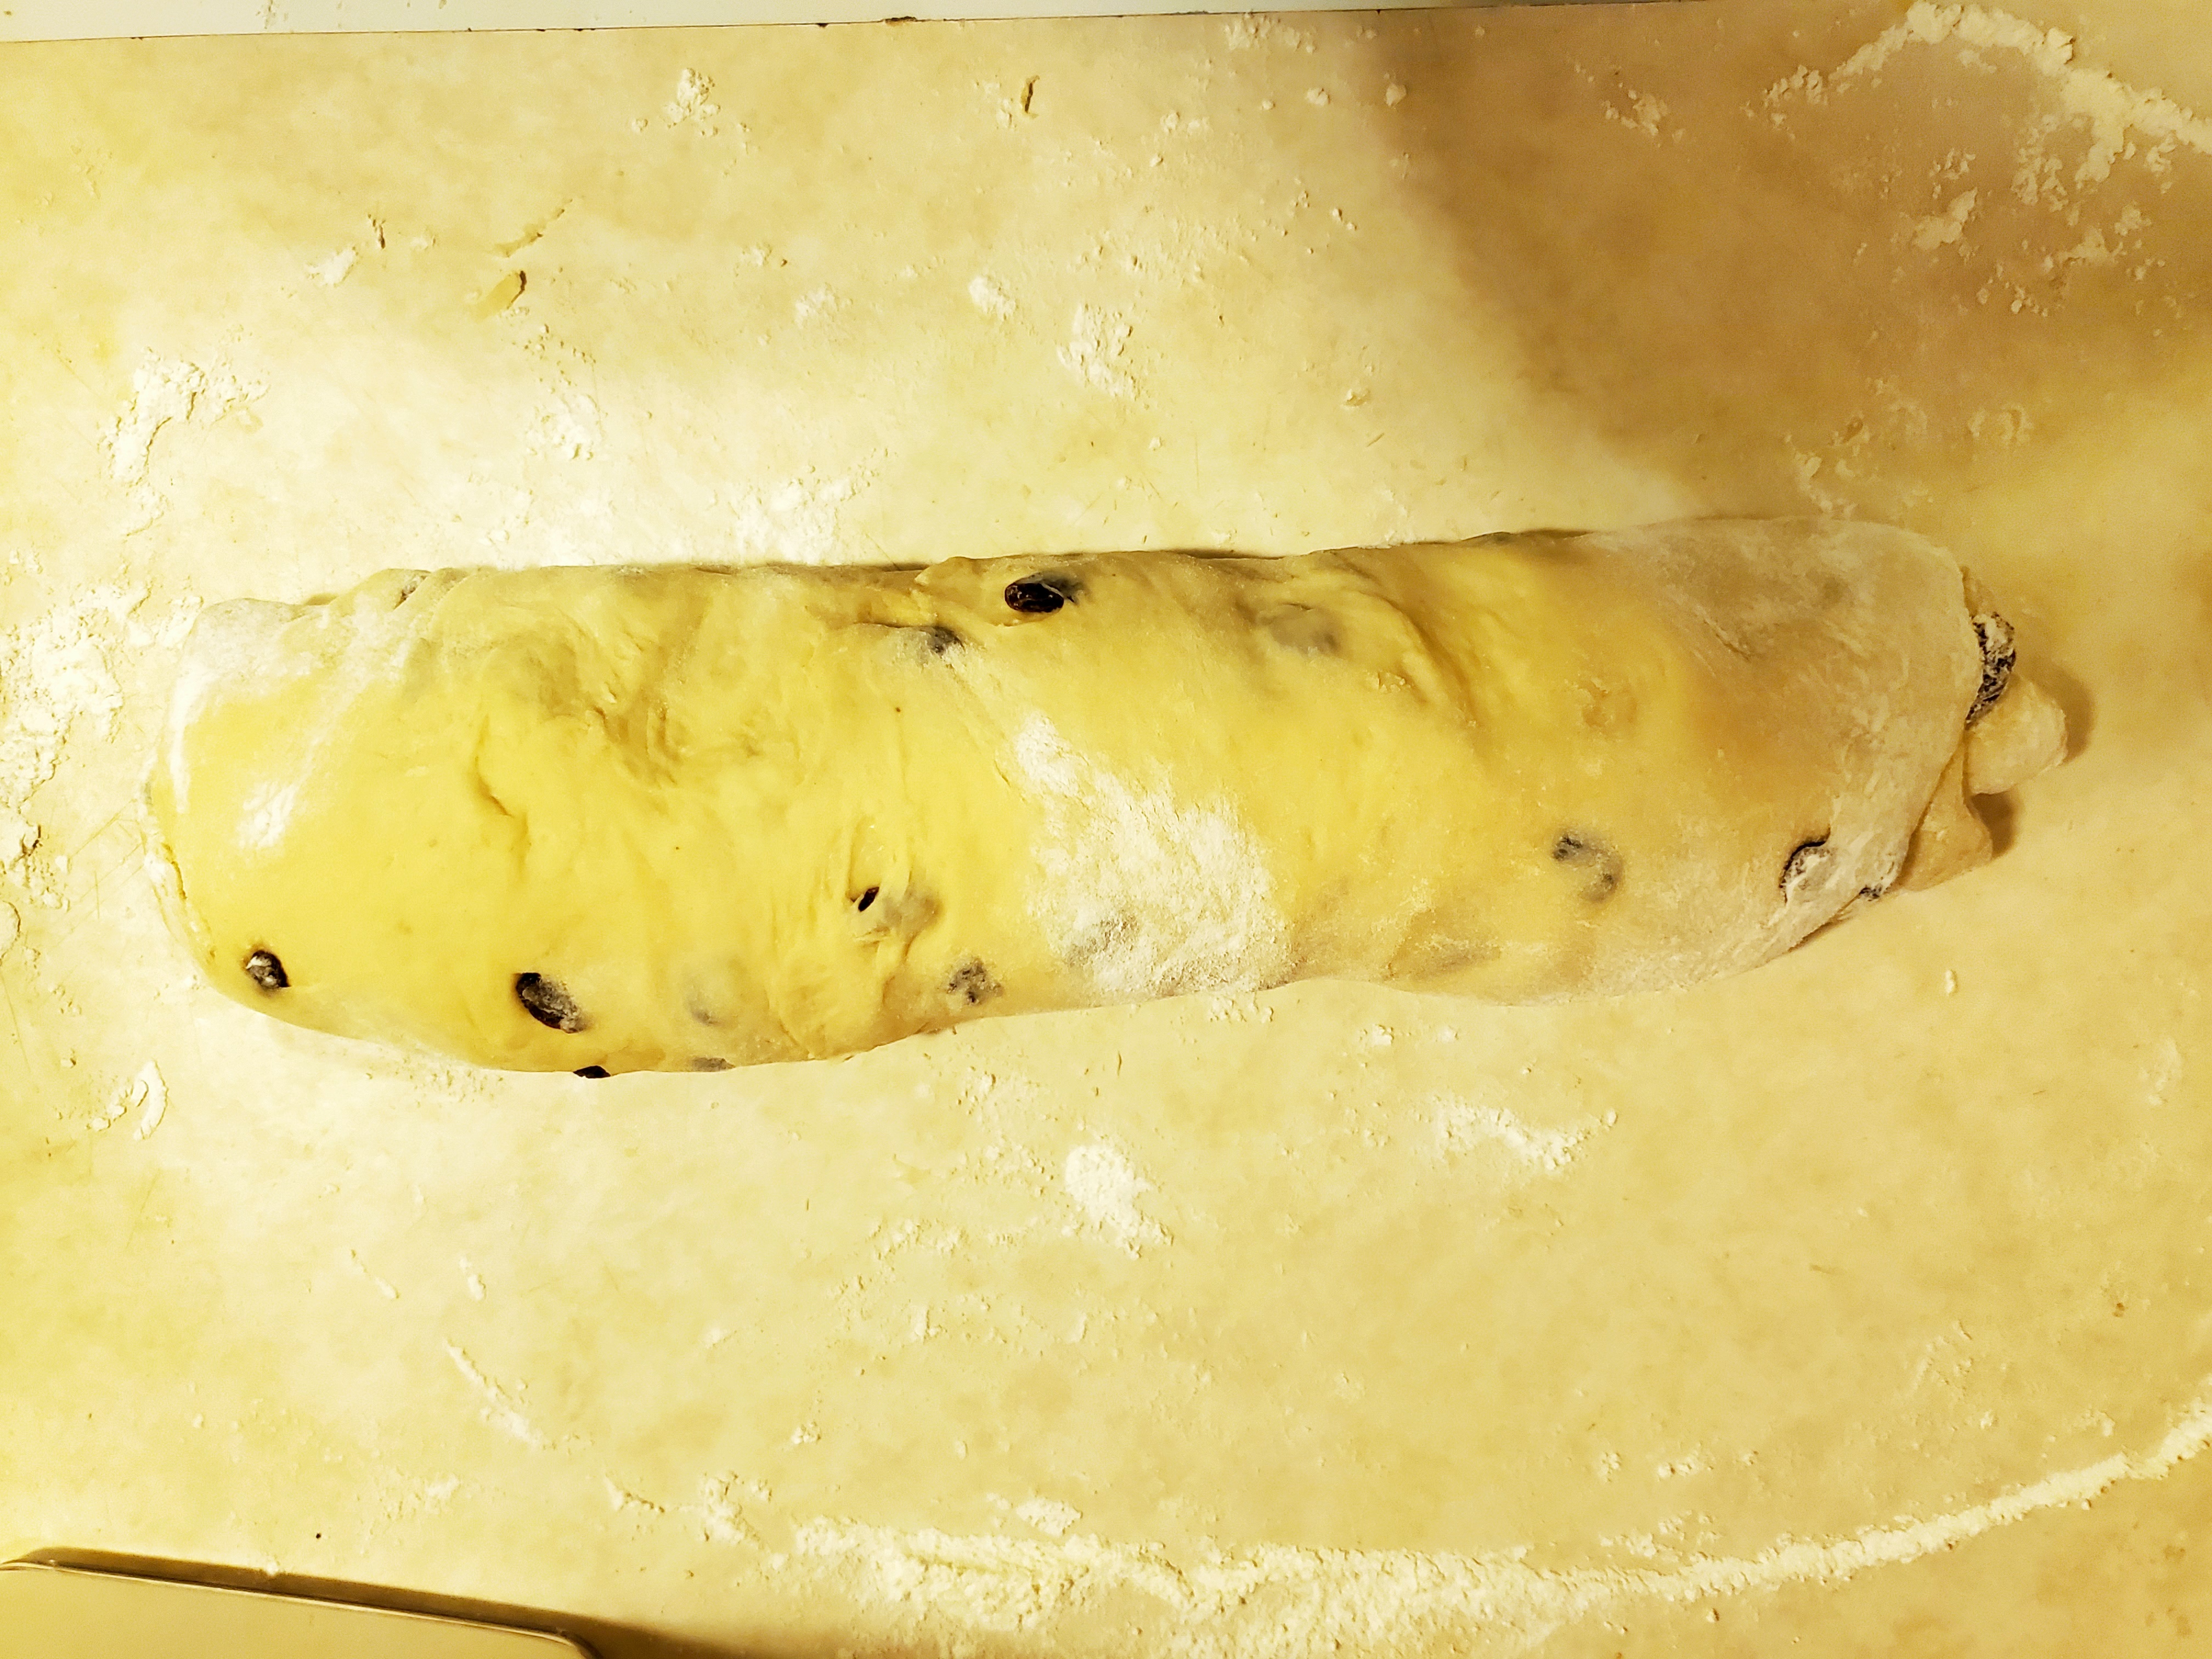
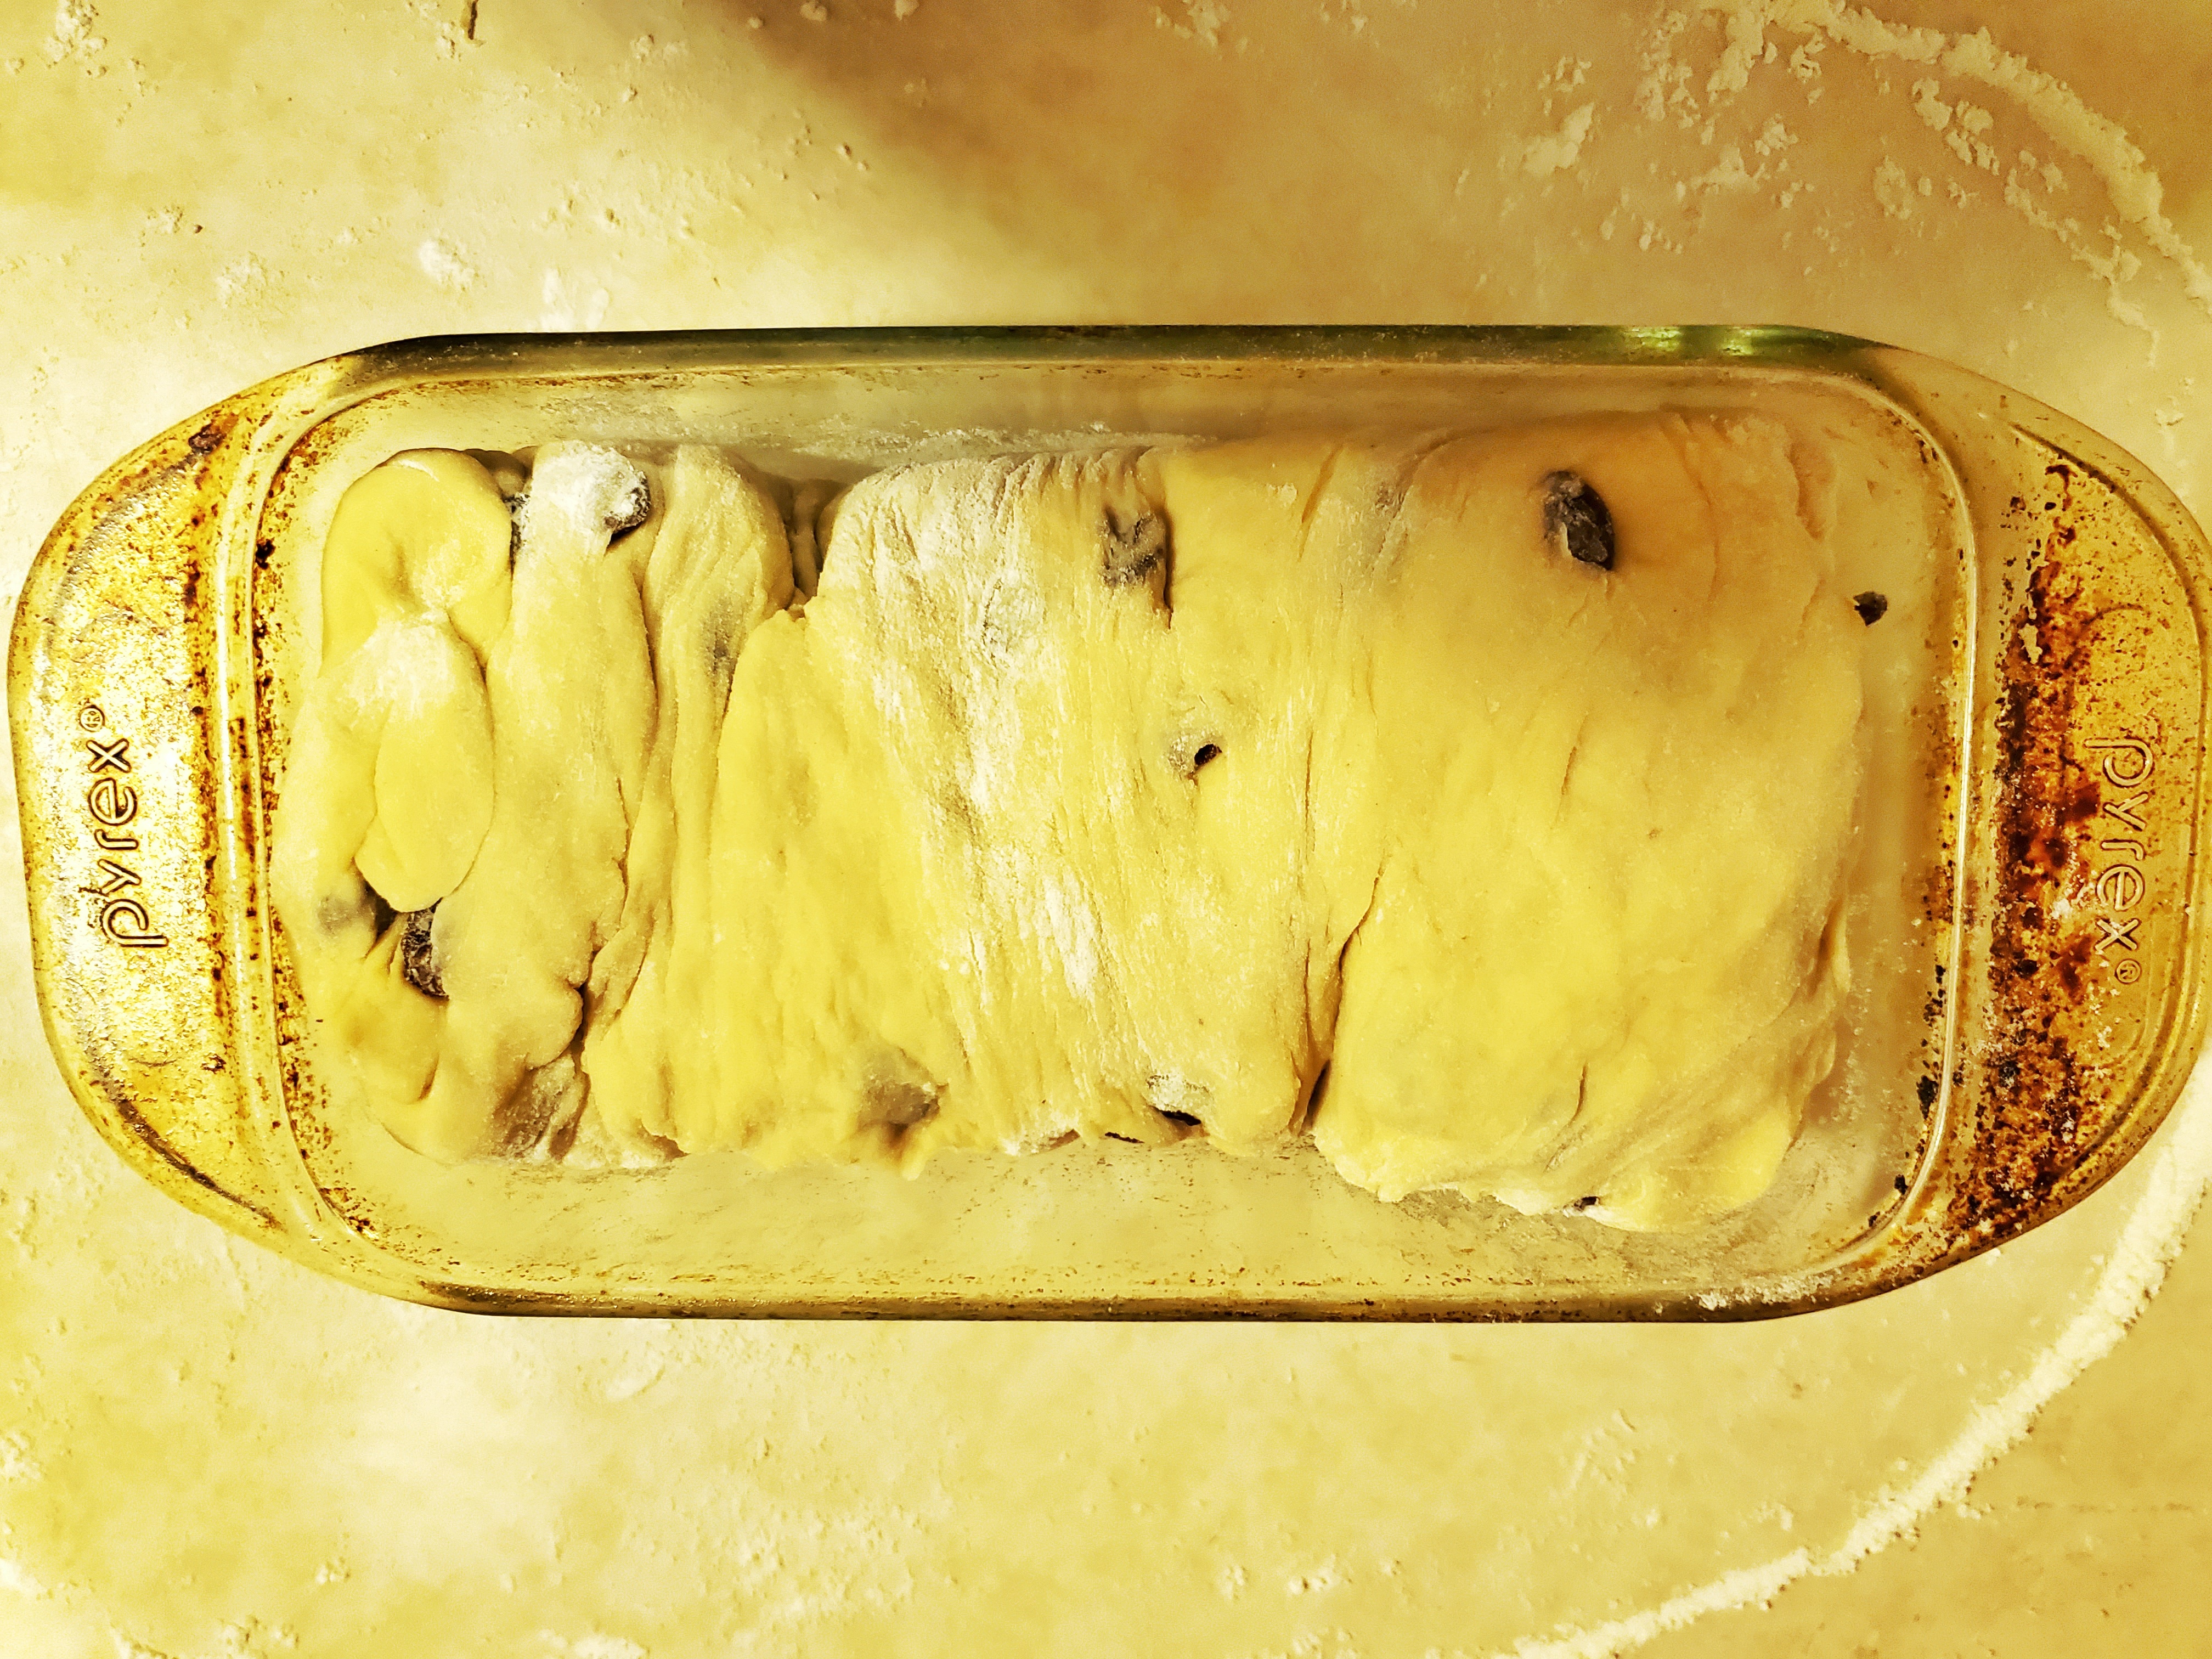
So, back to that cinnamon swirl bread. The recipe called for a 9″x 5″ loaf pan, which I don’t have. I have an 8.5″x4″. I thought, well, it won’t be too bad…

Rolled out raisin bread dough, an 8.5″x4″ glass pan to the right.

I rolled it out to about the length of my pan, but as I rolled it up into a pretty tight swirl, I thought, and went to put it into the pan, it was clearly too long. :( I had to squish it a bit, like a baklava, to get it to fit.

I thought it might be okay, and was happy with the rise:

The cinnamon-swirl bread rose about 2-3 inches above the top of the pan! Go, Yeasty Boys, go!

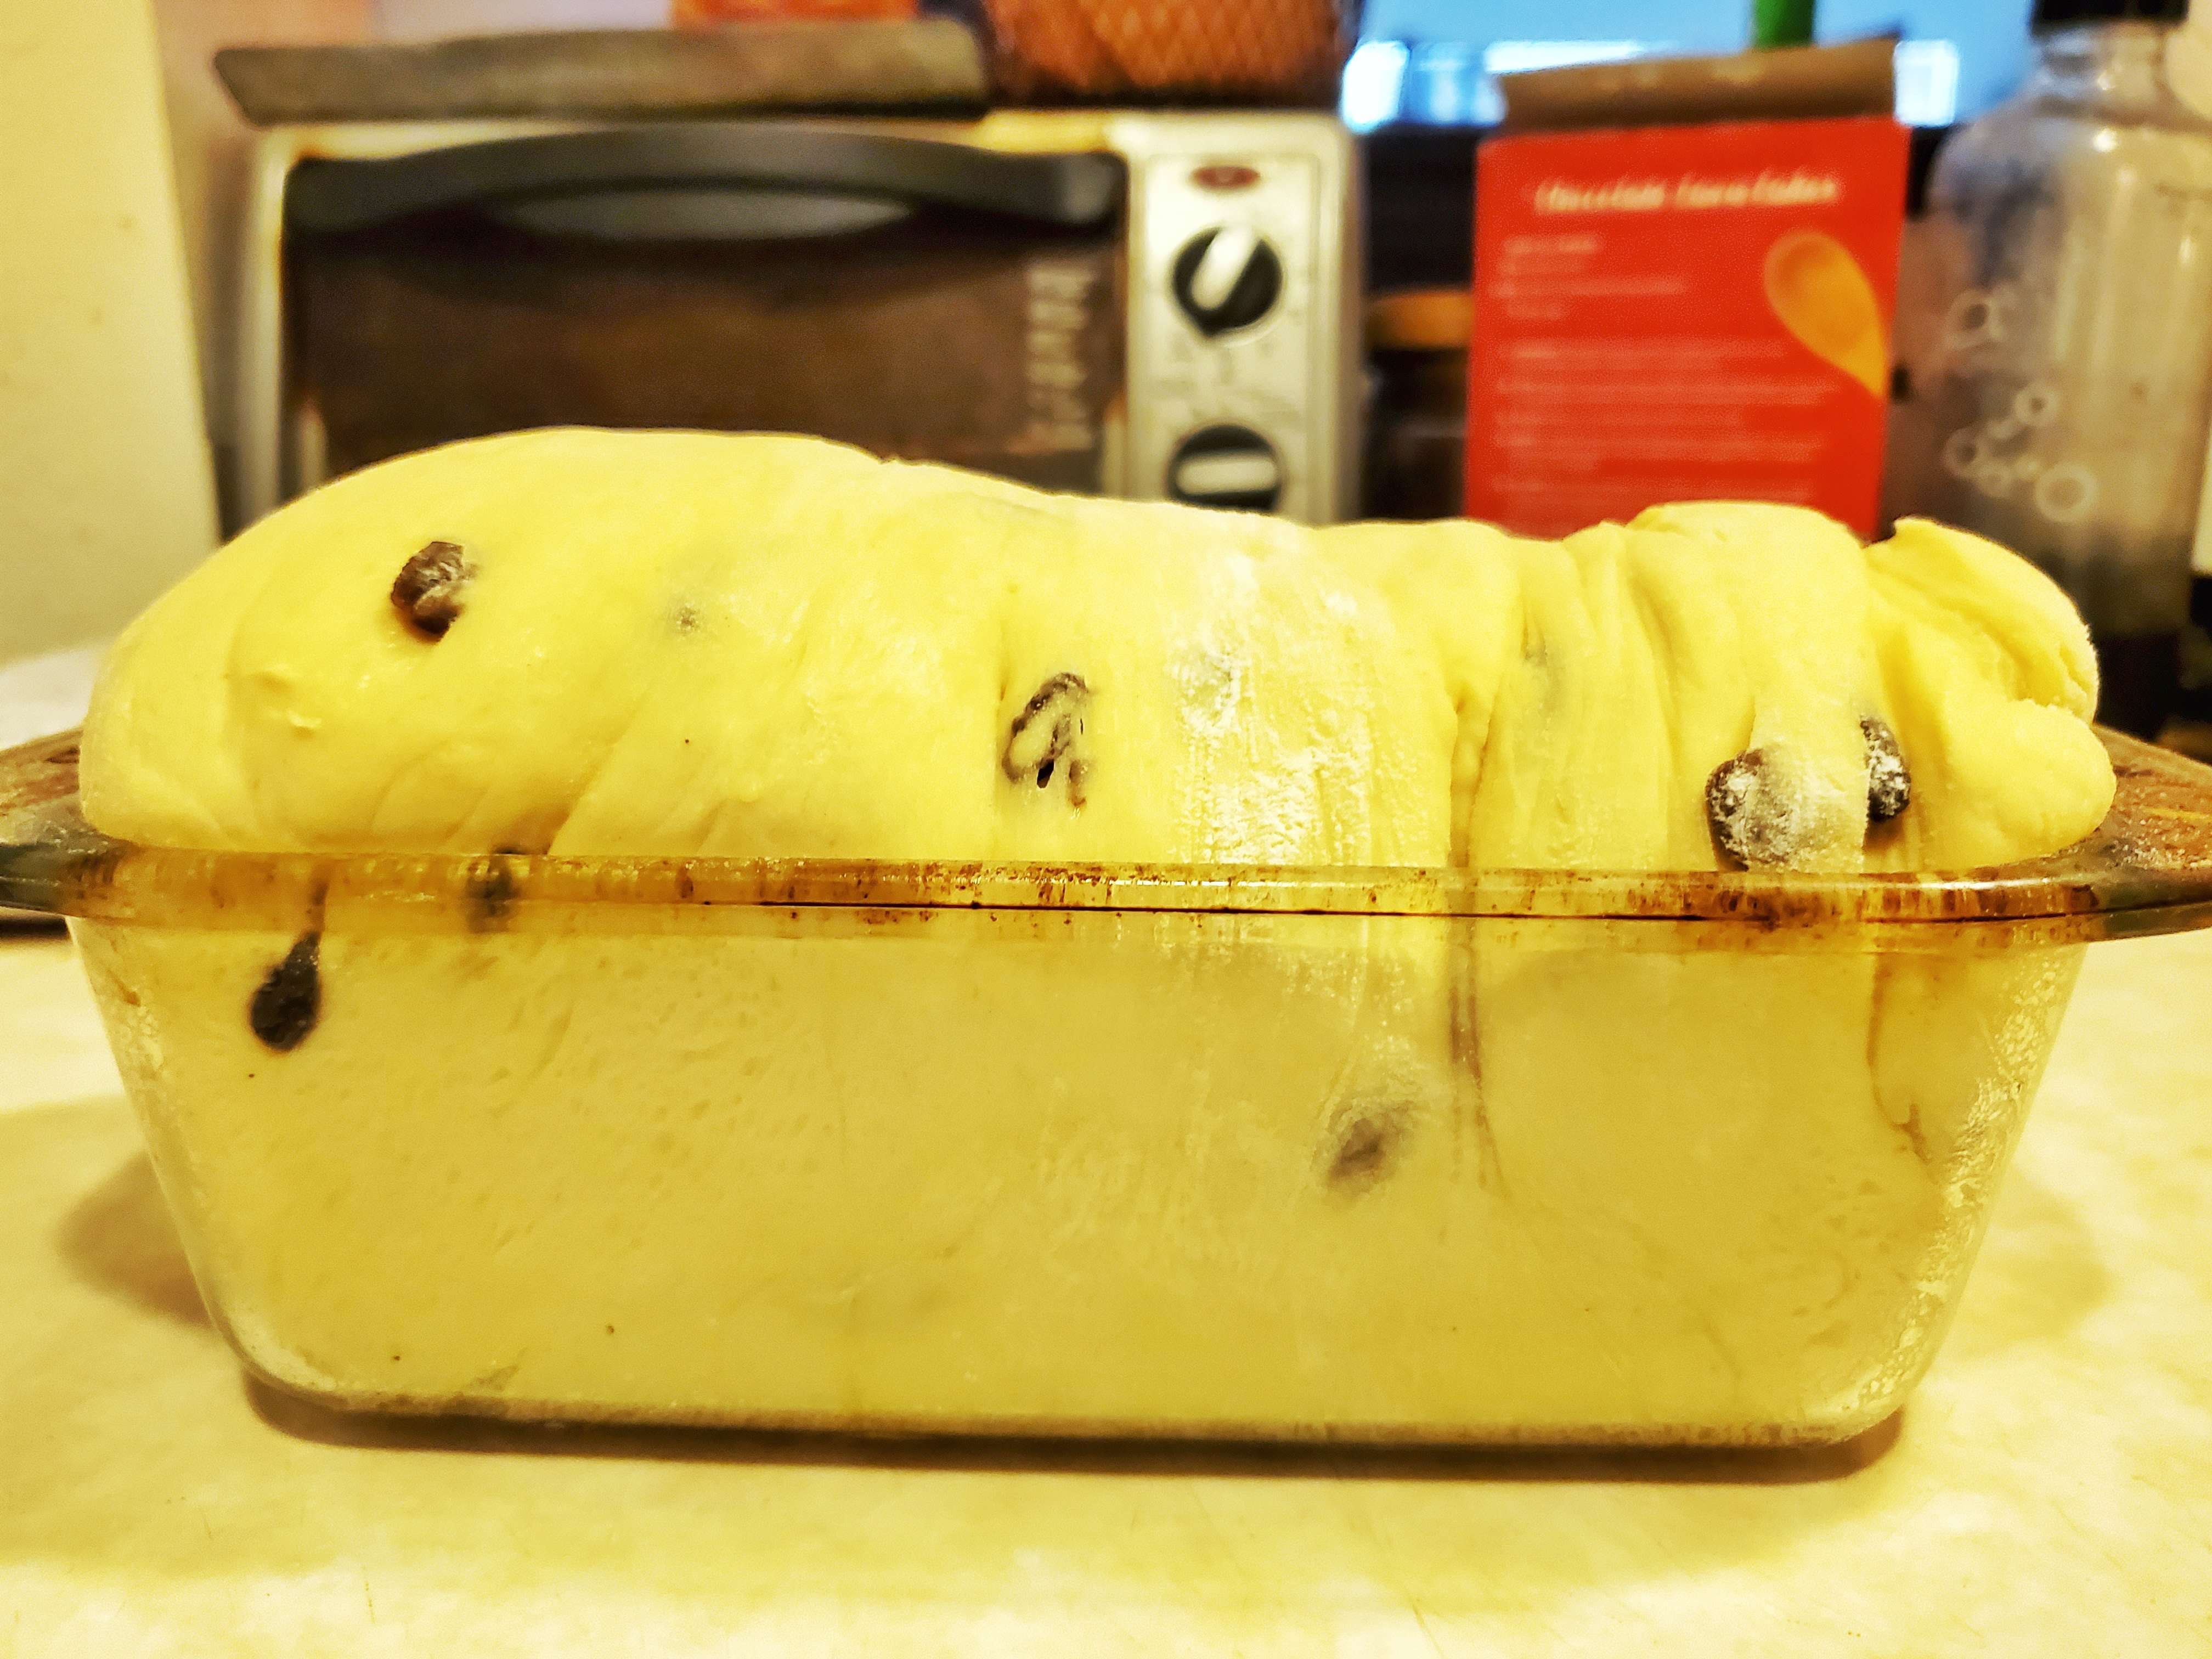
EXCEPT, my bread got SO big, it practically crawled out of the tin – the down-side seam lifting above the edge, and spilling that delicious cinnamon-sugar filling out onto the side of the tin, and down to the pan that was blocking the extra heat.

The cinnamon-sugar filling, spilled over and baked onto the side of the pan.

o_________________o

^ That’s my face, as I discovered this issue, and had to keep baking it so it would be edible.

I think next time I try this one, based on the amount of rise I got, I think I might cut the recipe nearly in half, so it will neatly fill the loaf pan I have, and won’t explode out of it. It’s either that, or buy a new tin, but that’s for the future, when I have a kitchen worth photographing. lol.

Anyway, there are many pitfalls to baking, and bread in particular, that I encountered here, but here’s what I learned:

  1. Read the recipe. Very closely. Before starting. I usually do this, but clearly didn’t this time.
  2. Know your equipment. I already know that my oven bakes hotter at the bottom, but I still need to find ways to combat this when baking. There’s no way around learning this aside from baking lots of things and seeing what happens.
  3. Make sure you have what you need. Be it tools, ingredients, time… If you don’t, consider adjusting the recipe to accommodate, or finding a different recipe.
  4. Learn about the roles of the ingredients in your bake. While I understand the basics of bread, and I’ve learned a TON from watching shows like “The Great British Bake Off”, or reading blogs, such as Joy the Baker, or magazines, like Cook’s Illustrated, I still have a lot to learn when it comes to how adding or changing things in a bake impacts the final result.

So what have you learned? Hopefully, what NOT to do. :) Please leave feedback or share your own baking mishaps below!

No. 3…French Toast for One Halloween

I was actually trying to figure out what to write about this week, knowing I already promoted the few Halloween cards I put on my Etsy store, but didn’t feel like that warranted a whole post on it’s own. So while I was making breakfast this morning, I whipped out my phone and started snapping pics of what I was making!

This is my recipe for French toast for one. I find most recipes for breakfasts make enough for a family, but aren’t the easiest to pare down for only one or two people, unfortunately. But I think one day, many, many moons ago, I just decided to make French toast, but only wanted a couple of pieces, and sort of figured out the easiest way to do it!

Now, some of you have probably heard that French toast is really meant to use day-old bread – it was a way for folks to use the bread from the previous day that was left over, and the eggy mixture is used to soften the bread a little. Now, I think I’ve only made this with stale french bread once, and it was great! Not as soft inside as the way Americans usually have their French toast, even at restaurants. But, make this with what you have! I happened to have some fresh potato bread (from the store), and knew this would be a great, yummy breakfast. I love potato bread. I was introduced to potato bread while working at a local hotel in Fairbanks when I was sixteen. It’s such a rich, yummy bread.

Okay, so you start off with super simple staples: egg, milk, vanilla extract, and cinnamon. Put all of these into a wide, shallow bowl or even a piece of Tupperware that’s big enough to fit your bread slices in, and isn’t terribly deep.

Then, you’re gonna take a fork, and whisk it until it’s frothy, and the ingredients are well blended.

I would have had a quick video for you here, but that requires a professional account, which is a bit rich for me at the moment.

I use a fork, because once I’m done with mixing the egg mixture, I can just wash the fork, and use it to eat with – one less dish to do later!

The cinnamon will be in little bits – it’s a spice that’s so finely ground, it doesn’t take to being separated from itself very well, especially in cold liquids. You can use a beater or whisk for this, but I don’t really feel like the effort is worth it, as I don’t really see any difference, honestly, lol.

Okay, now that your eggy mix is ready, get your pan hot on a medium heat. Because you’re likely not using stale bread, you really don’t need to leave your fresh bread in the mix very long. Just a moment on each side. If you leave it in too long, when you go to pick it up, it will tear apart before you can get it in the pan.

I took this picture so fast, you have no idea. lol. Also, you’re likely to pick up most of the cinnamon with the first slice, so feel free to sprinkle a little more into the mixture.

I usually use cooking spray for the first slice (even with pancakes!), but you don’t have to, if you don’t want to. Excuse my crappy-looking pan in this next pic – the style of pan is one of my favorites, but this one is fairly old and a hand-me-down.

You’ll want to cook them about 2 minutes on each side – I’m not great about measuring or timing things like this when I cook – so use your spatula – if the edges aren’t sticking to the bottom of the pan, it’s probably ready to be flipped. And with this, you can always flip it back over if it needs more time. I actually measured out how much of everything I put in – I usually just eyeball things like this, which isn’t that helpful for you!

That’s the perfect dark golden brown!

This makes 2-3 slices, depending on how big your bread is. I usually only make two slices, which is enough for me! Serve with your favorite French toast topping, and enjoy! I like to use Log Cabin syrup, because it doesn’t have any artificial flavorings or high fructose corn syrup. I like maple syrup, too, but it’s expensive, and I honestly didn’t really grow up with it, so I default to this stuff. I also like to put fruit and whipped cream on top, if I have some available!

I’ve got some pre-cooked bacon and some coffee, for a fairly quick but luxurious breakfast!
French Toast for One

Level: Easy
Serves: 1 2-slice serving
Total Time: 20 minutes

Ingredients:
– 1 egg
– 1/2 cup milk or cream
– 1/4 tsp vanilla extract
– about 1/2 tsp ground cinnamon (to taste)
– 2 slices of bread
Tools:
– medium pan
– shallow, wide bowl or plastic Tupperware bin
– fork
– spatula

Method:
  1. Put a pan on the stove, and heat to medium.
  2. Put egg, milk, cinnamon, and vanilla into a shallow bowl and whisk thoroughly with a fork.
  3. Gently place a slice of bread into the egg mixture, then turn it over gently to coat the other side.
  4. Lift the coated bread slice gingerly and quickly put it into the pan. It should sizzle loudly when it hits the pan.
  5. Cook for about two minutes on each side, or until the edges lift easily and the cooked side is a dark golden brown.
  6. Serve on a plate with your favorite French toast toppings!

I also moved some Halloween decorations around, and like this much better:

The gilded frame and the skeleton arm candle holder are new, and I love them so much!

What’s your favorite part to Halloween? I can’t decide between decorating, and dressing up!

As an Amazon Associate I earn from any qualifying purchases made from links on my site.

No. 2…Ribbons to Bits!

So, a few weeks ago, I had to go run an errand up north, and knew I had to stop by Michael’s while I was nearby. I rarely go to Michael’s anymore, because it’s much farther away than Joann’s, but I do like that Michael’s has more crafting items, since they don’t also focus on fabrics.

Anyway, I saw this fall garland I quite liked, but didn’t want to pay $7.99 (plus 10% tax) on 6 feet of garland that was half as long as I needed for my staircase banister.

I really liked the combination of colors – orange, pink, purple. But if you look at where the strips of cloth are on the twine, it appears that they’re just glued on. I saw that and thought to myself, “I can make this even better!”

So a week or so later, I went to Joann’s, knowing they’d have a great ribbon selection, and set to task finding the right ribbon for my new craft.

I got 12 feet of twine for the length of my garland, and got a variety of ribbon that I thought worked well together. I added a sort of sparkly maroon ribbon because I love a little sparkle to things. :) I always wrap some garland and lights around my banister for the holiday season (changing it up for December/January), so I thought some sparkly would go well with the lights I have.

Now I’ll walk through what I did, but this is SO easy, you can really play around with it and make whatever suits your fancy, adding other things that you think will work well, such as ornaments or baubles.

What I did first, was get comfortable on my couch with the ribbon, a measuring tape, and some fabric scissors. I do recommend sharp fabric scissors. For those of you who don’t sew, fabric scissors are basically just sharp shears you ONLY use for fabric. No metal, paper, plastic, food, etc. You don’t have to use super-expensive ones from the fabric store, but it’s good if they have some weight to them. If you don’t have fabric scissors, you’ll probably be fine, but if they’re not very sharp, you will have a tough time getting through the ribbon without fraying the fabric. You want a sharp, clean cut.

image of knot at the end of the twine.
Yes, that is The Great British Bake Off in the background.

Second, I unraveled my twine, and put knot at one end like shown above. I’m not really worried any of the ribbons will fall off, but since they’ll only be secured by their own knot around the twine, and this garland will live in a box of decorations, it can never hurt to add a knot on the end.

Next, I took a look at my various ribbons. I could have thought more about this step at the store, but I’m also one to kind of wing a few details when starting a project I’m fairly confident about. If you make a mistake, you learn from it, right?

Each spool of ribbon was a slightly different length. The orange gingham, sparkly maroon, and the purple stitched ribbons were all 9 feet long. The burlap-type ribbon was 12 feet, and the pink and white ribbons were 21 feet. I pulled out some of the pink ribbon to sort of eyeball how long I thought the ribbon needed to be (with the knot) to get the look I wanted. I determined about 7 inches was what I wanted, but I wasn’t sure if the shorter spools would last the length of the twine. I played around with the numbers on my phone, and determined that if there were two cuts of each ribbon per foot, the shorter spools could be cut at 6.5 inches without compromising the look or worrying too much about not having enough ribbon. This became a little tricky with the purple stitched ribbon, because it’s wider than the others, it comes out a little shorter than the others once tied around the twine. It’s not a huge difference – maybe half an inch, but it’s barely noticeable. The orange and maroon ribbon actually tied tightly enough that it stretched a bit to come out to the same fullness as the other ribbon.

I’m sorry I don’t have more progress photos – they didn’t all turn out very well.

Cut ribbon all laid out, with my progress so far.

As you can see, there’s roughly an inch or so between each ribbon. The great thing about tying it in knots around the twine is that you can make adjustments as you go along. I’m pretty good at eyeballing things, but if you’re not, feel free to take the length of your main twine, and use a tape measure and a Sharpie to mark where you want to put the ribbons.

I cut each length of ribbon at an angle, to give it a nicer end. I actually wound up with a lot of extra ribbon I can use for other projects! Not as much of the shorter spools, of course – only about 7 inches, but enough to add to a card or around some candy or gift.

All in all, this project didn’t take that long – I think I did it over a couple of hours – I also got up to make some food, take the dogs out, etc. But so easy to do while watching TV or in between other priorities.

If you’d like to know what specific ribbon I got, here’s the list:

  • Twine – Decorative Ribbon by Joann’s, 6 mm x 12 feet
  • “burlap” – Decorative Ribbon by Joann’s, 5/8 inch x 12 feet
  • Pink grossgrain – Offray, 5/8 inch x 21 feet
  • White grossgrain – Offray, 5/8 inch x 21 feet
  • Orange gingham – Offray, 5/8 inch x 9 feet
  • Purple stitched – Offray, 7/8 inch x 9 feet
  • Maroon sparkly, Offray, 5/8 inch x 9 feet

The reason the purple stitched is a bit wider, is that I couldn’t find the same shade of purple with the stitching in a smaller width. I could have gotten the same color that is the same type of ribbon (grossgrain) as the pink and white, but I really wanted it to be a bit different, and not all be so SAMEY. If ya know what I mean. :D

I really love how it turned out. It could be a little more “fluffy”, I suppose, but I do like how simple it is. I don’t expect it to fray too much, and if it does, I can always use some fray stop liquid or clear nail polish to stop it for getting too bad. But fraying might work well for this kind of garland, because it will add to the charm. If/when I move, I can probably do some really fun stuff with it, depending on my set up. ALSO – it’s exactly the right length! It goes from one end of the banister to the other, wrapping around, which makes me so happy. All the other fake leaf garlands I have are too short, so I have to pin them or use the lights to help keep them together and have them not fall down, because I can’t even twist them around. lol. I think this garland will even go with the orange and brown ribbon I normally put up.

And, my favorite feature of my set up – this set of lights I picked up a few years ago can switch from orange – to PURPLE! This means I don’t need to re-string up any lights between Autumn (September), Halloween (October), and Thanksgiving (November). I can just switch them back and forth!

I mean, either orange or purple you can use for Halloween, but purple is more spooOOOoooky, lol, and goes well with some green-lit trees I have, which I actually need to fix, because the lights don’t work anymore. D:

I apologize for no full photos of my banister. The garland looks great! But my apartment is a total mess right now. We’re purging some items, and dealing with a meal moth problem in our pantry, so there’s boxes of food all over the place. lol. It’s been a nightmare since January. They’re so hard to get rid of. But I think I’m getting close. *fingers crossed* The good thing about it is that it’s forced me to put my sugar, flour, and grains into better containers, which I’ve wanted to do forever.

The very last thing I wanted to share with you, is that the only way that doing this myself was worth it, is because I got a lot of the supplies on sale. I even actually spent a tiny bit more than if I had bought two of the Michael’s garland, but only a few dollars. If we take the original Michael’s garland, at $7.99/6 feet (plus tax), we get about $17.58 for two garlands (enough to cover my banister).

The way to make it worth it was: Joann’s was having a big store-wide sale, making Offray ribbons buy three, get two free, AND I had a 60% off coupon for one full-priced item. So this is the breakdown:

  • Twine: Original price: $4.99, with 60% off: $2.99
  • “burlap”: $2.99
  • Pink: Original price: $3.99, sale price: FREE
  • White: $3.99
  • Purple: $5.99
  • Orange: $3.99
  • Maroon: Original Price: $3.99, sale price: FREE

Total spent (with tax): about $21.95. So a little more expensive, but worth it to make something I love that I can customize as much as I want, and is all in one piece. And, honestly, I can use any time of year. I’m also not worried about it falling apart after a few years.

Have you ever decided to make something your own to replicate something you saw in a store? I take pictures of decor all the time, hoping to make it myself, but cheaper or better. I might even make one of these for Yule! Tell me about your fun copycat projects!

Keep it Crafty!
– Raven

No. 1…Cider House Rules

This isn’t a review of the 1999 movie starring Toby Maguire, I just like playing with words and using movie and song titles to add a bit of fun to my blog. :) Though, John Irving wrote the book it’s based off of, as well as my favorite novel, A Prayer for Owen Meany. But I digress.

No, this post is all about the humble autumnal favorite: spiced apple cider.

Close-up of cider - cinnamon sticks and whole allspice floating in cider.
Yummy, spiced, warm apple cider.

This is also my first post! So welcome! Hopefully, this will be the first of many, many yummy posts, crafty posts, and funny, weird posts. Because that’s how I roll. :D

A clove studded orange is the most fun you’ll have with an uneaten orange without throwing it at something!

I received a gallon of freshly pressed cider from a friend, and made quick work of spicing it up a little (thought it was perfectly tasty on it’s own)!

Look at that steamy goodness!

I hope you all get a chance to enjoy some warm spiced cider this fall. I prefer making my own this way, because most places serve the stuff out of a packet which is loaded with sugar. Don’t get me wrong, I like my sweet stuff, but the packet stuff is always a little too sweet and fake to me.

Enjoying a cup of this lovely amber drink while I ice my heel and watch The Great British Bake Off with one of my dogs, Dobby.

Spiced Apple Cider

Level: Easy
Serves: 16 8oz. servings
Active Time: 5 minutes
Passive Time: 1 hour
Total Time: 65 minutes

Ingredients:
– 1 gallon apple cider, unfiltered (not regular apple juice)
– 1 orange (any larger variety, or several small)
– 2 Tbsp whole cloves
– 1 Tbsp whole allspice
– 2 cinnamon sticks
– 1/4 cup white sugar (to taste) optional, see notes

Tools:
– large pot, dutch oven, or slow cooker (with lid, if possible)
– wooden spoon
– ladle
– funnel (with filter, if available)
– containers for finished cider (see notes)
– cheesecloth (see notes)
– baker’s twine (see notes)

Method:
  1. Pierce rind of orange with whole cloves, leaving them embedded. If serving cider with oranges, feel free to make a design in the orange with the cloves!
  2. Pour cider into large dutch oven or pot. If a lid is available, great! Set burner temperature to low, and cover, so as not to lose too much water as it heats.
  3. Gently drop studded orange, allspice and cinnamon sticks into cider to float freely. If you are inclined, add your sugar as well. Start with 1/4 cup, then add more to taste once it’s dissolved into the warm cider.
  4. As cider heats, stir occasionally and taste test, adding more sugar if desired.
  5. Heat until just below simmering, making sure all sugar has dissolved completely.
  6. You can now discard of the orange and the floating bits if you don’t want to worry about them being in the way of serving.
  7. If serving right away, it’s best to leave on a low burner or to make in a crock pot so you can leave it on a warm setting and people can come get some as they like. Make sure it is not simmering – just staying warm. You don’t want it to boil away during your gathering!
  8. If not serving right away, continue with the following steps.
  9. Place funnel in the opening of the original cider container, or whichever containers you want to store the cider in. If your funnel doesn’t have a strainer-type insert, you can use a bit of cheesecloth to catch the floating bits – or, just let them sit in the cider.
  10. Using a ladle, gently move cider from the cooking pot to the funnel, filling up your container(s) as needed.
  11. Wait for cider to finish cooling completely before securing the lid of the container(s) and placing in the fridge.
  12. To serve, once chilled: shake the container, to mix back in the sediment. Warm up in your favorite mug, or reheat the whole batch on the stove!

Notes:
  • If you don’t have whole allspice, cloves, or cinnamon, you can use ground as well, but you will have more sediment at the bottom of your mixture over time, and there might be a slight grittiness to the drink if you add too much. You also will need to pierce the orange with the tip of a knife to let the orange essence seep into your cider. I’ve definitely used ground cinnamon when I ran out of cinnamon sticks, and it had a great taste!
  • You can reuse whatever container the cider came in, or put it in something different, divide it up for gifts, etc. Just make sure the containers are clean!
  • If you want to avoid having to fish spice bits out of your cider, you can put all the whole spices into a small parcel of layered cheesecloth and tie off with baker’s twine. It totally depends on how much effort you want to put in at what stage in the process.
  • I think most store-bought cider already has quite a bit of extra sugar added – so please add sugar at your own risk! I definitely do mine to taste, because sometimes the inherent bitterness of the orange oils can alter the taste of the cider slightly until the sweetness from the flesh part comes through. Some oranges are just not that sweet, either, so play around with the ratios.

Have you tried this recipe? Please let me know how it turned out below!